
1. About this manual
A guide for beach operators and municipal account users who use the monitoring console in their daily work. For each screen it explains what you can do and how to operate it.
| Item | Description |
|---|---|
| Audience | Beach operators, municipal account staff, and lifesavers |
| Scope | Beach Watch System (海辺のみまもりシステム) monitoring console (used in a browser) |
| Devices | PC, tablet, or mobile phone (all open in a browser) |
| Terms | The rectangular region drawn over the video is called the "rip current area" (the button is labeled "Draw area"). A single monitored beach location is simply called a "beach", matching the screens |
- This manual is served by the same server as the console. Open it from Open the operating manual on the sign-in screen, or with the ? button at the top right of each screen.
- You can read it on a phone, tablet, or PC. The display automatically matches the device you open it on, and you can switch with the Device buttons above: PC, Tablet, or Phone. The selected device is kept in the page address (e.g.
?dev=pc), so you can share the link as is. - You can print it on paper with the browser's print function. The printout includes the steps for all devices.
2. Signing in and moving between screens
2.1 Signing in
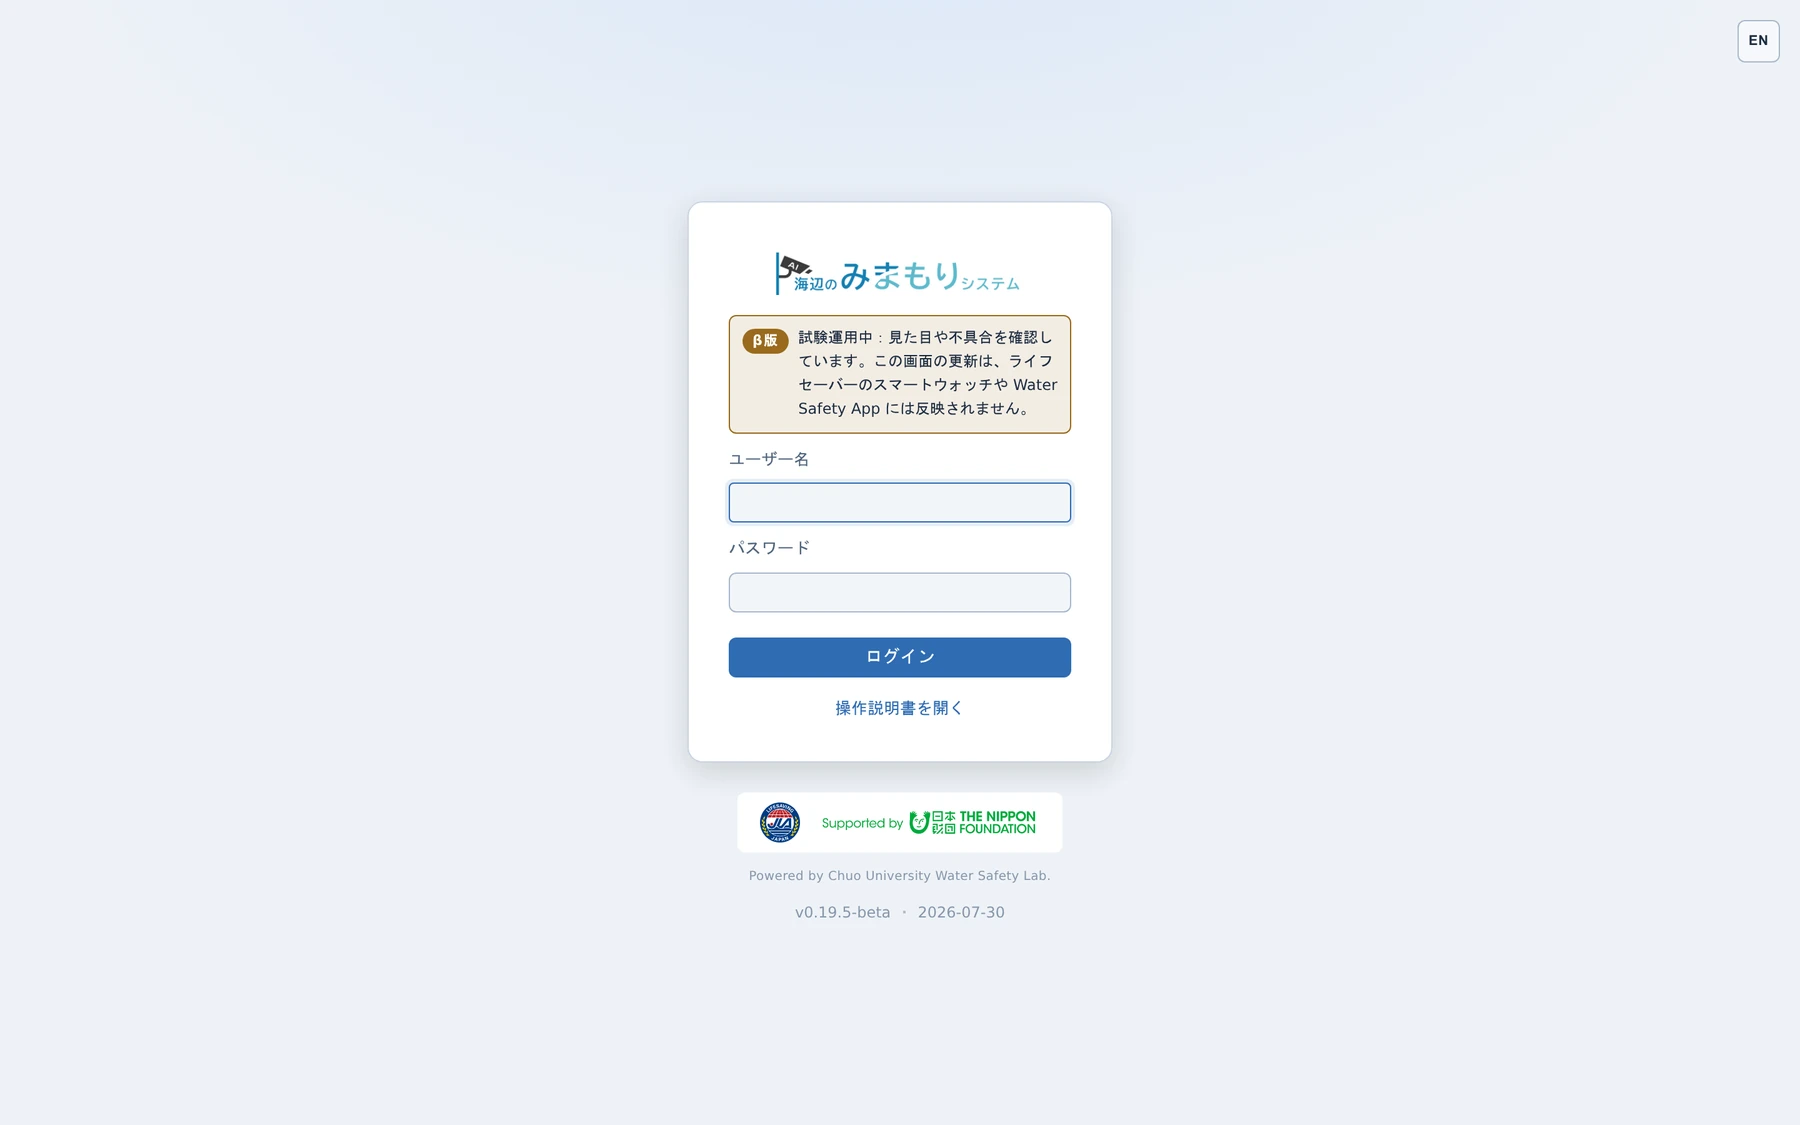
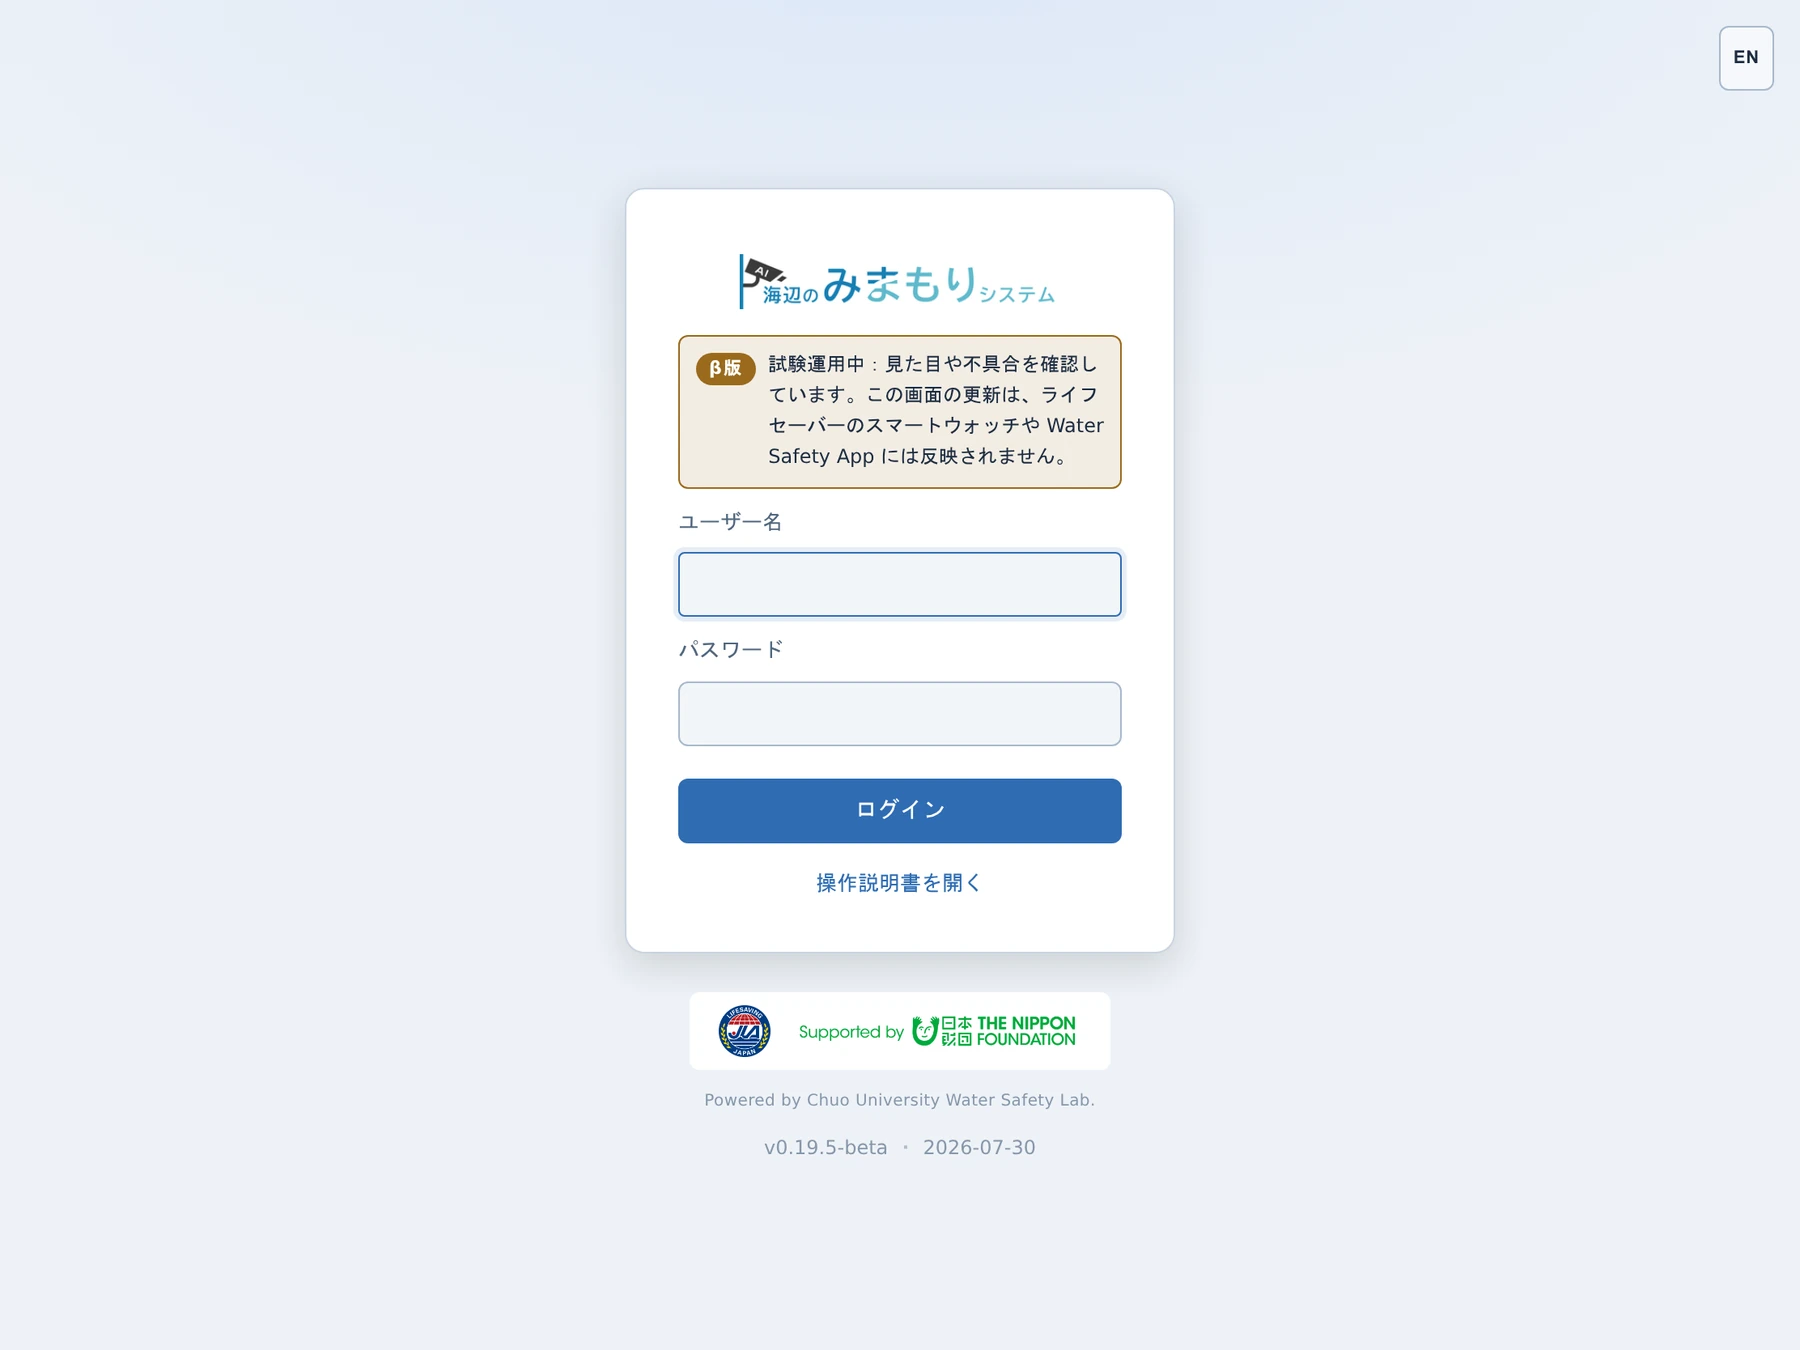
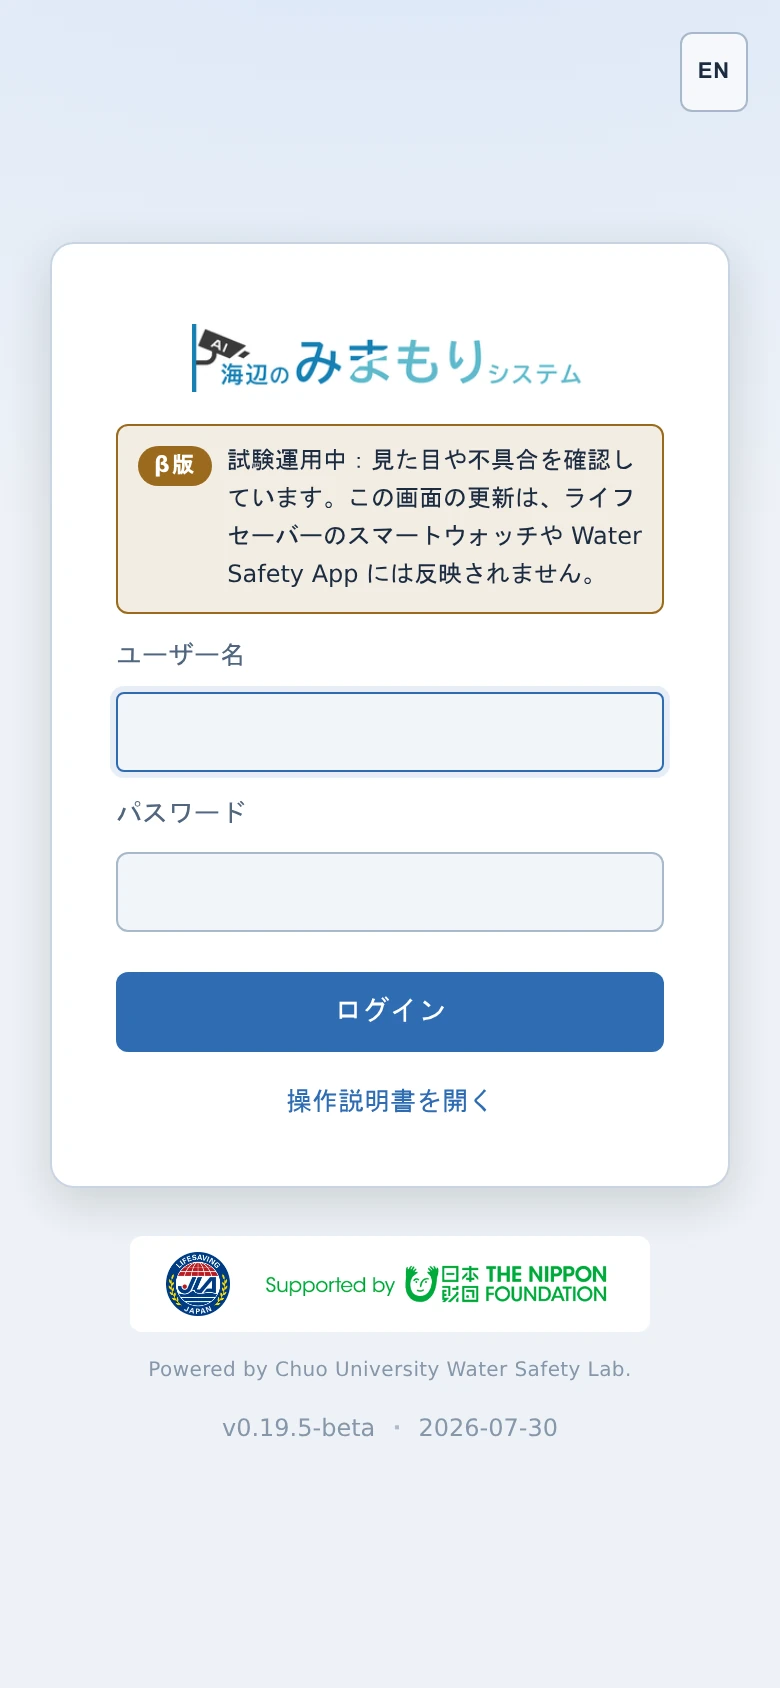
Open the console in a browser and the sign-in screen appears. Enter the username and password you were given.
| Account type | Visible scope | Permissions |
|---|---|---|
| Administrator (admin) | All beaches | All operations, detection settings, account management, and sending notifications |
| Municipal account (…-lg) | Assigned beaches only | Viewing and operating every screen (including area and detection settings). Account management and sending notifications are admin only |
After signing in, the buttons at the top right switch between Japanese / English and dark / light display. Switching takes effect without reloading, and the same settings apply the next time you open the console (the sign-in screen has only the EN button). On a phone, these buttons are inside the three-line menu at the top right.
2.2 Moving between screens
You move between five screens: Monitor, Manage, Notification settings, Alert log, and Visitors.
Use the navigation at the top of the screen.
Intended for landscape use. Use the navigation at the top of the screen. In portrait the screen becomes narrower and the navigation moves to tabs at the bottom of the screen.
The navigation is the tabs at the bottom of the screen. Press a tab to move.

| No. | Item | Description |
|---|---|---|
| 1 | Beaches | Filters which beaches the whole console shows (accounts with two or more beaches) |
| 2 | ? | Opens this operating manual |
| 3 | EN | Switches Japanese / English |
| 4 | ◐ | Switches dark / light display |
| 5 | Bell | Opens the notification center. A number appears when there are unread items |
| 6 | Sign out | Signs out of the console |

| No. | Item | Description |
|---|---|---|
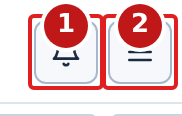
| 1 | Bell | Opens the notification center. A number appears when there are unread items |
| 2 | Three-line menu | Holds the operating manual, Japanese / English switch, dark / light switch, and sign-out. The beach selector is here too for accounts with two or more beaches |
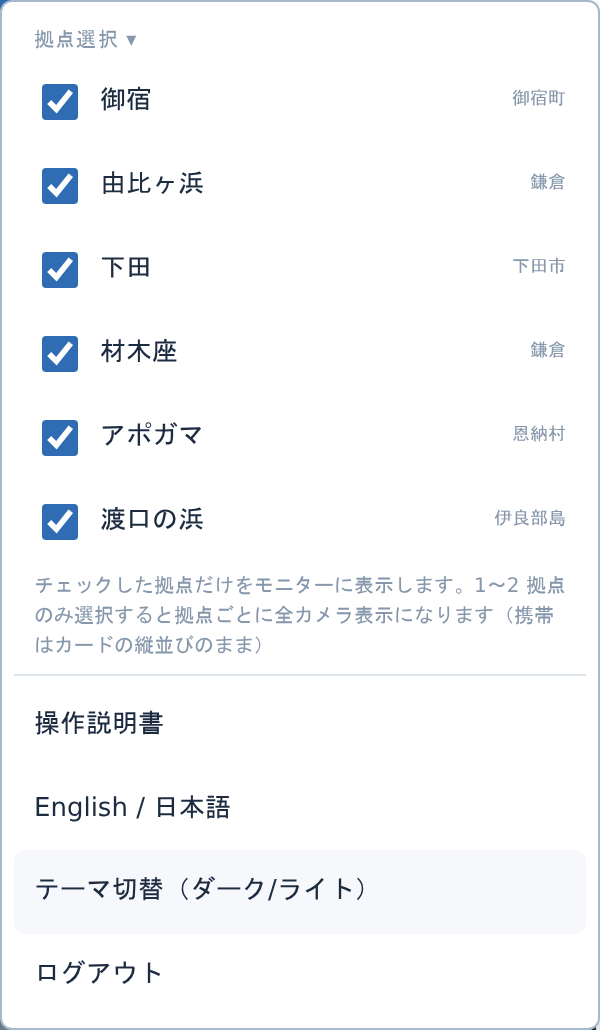

Use the Beaches selector at the top right (inside the three-line menu on a phone) to filter which beaches the whole console shows. The selection applies to the beach tabs and the beach bar on every screen. It is available to any account assigned two or more beaches — administrators see every beach, local-government accounts see only the beaches they are responsible for. Accounts assigned a single beach see neither the selector nor the beach bar, as there is nothing to choose from.
3. Monitor (/)
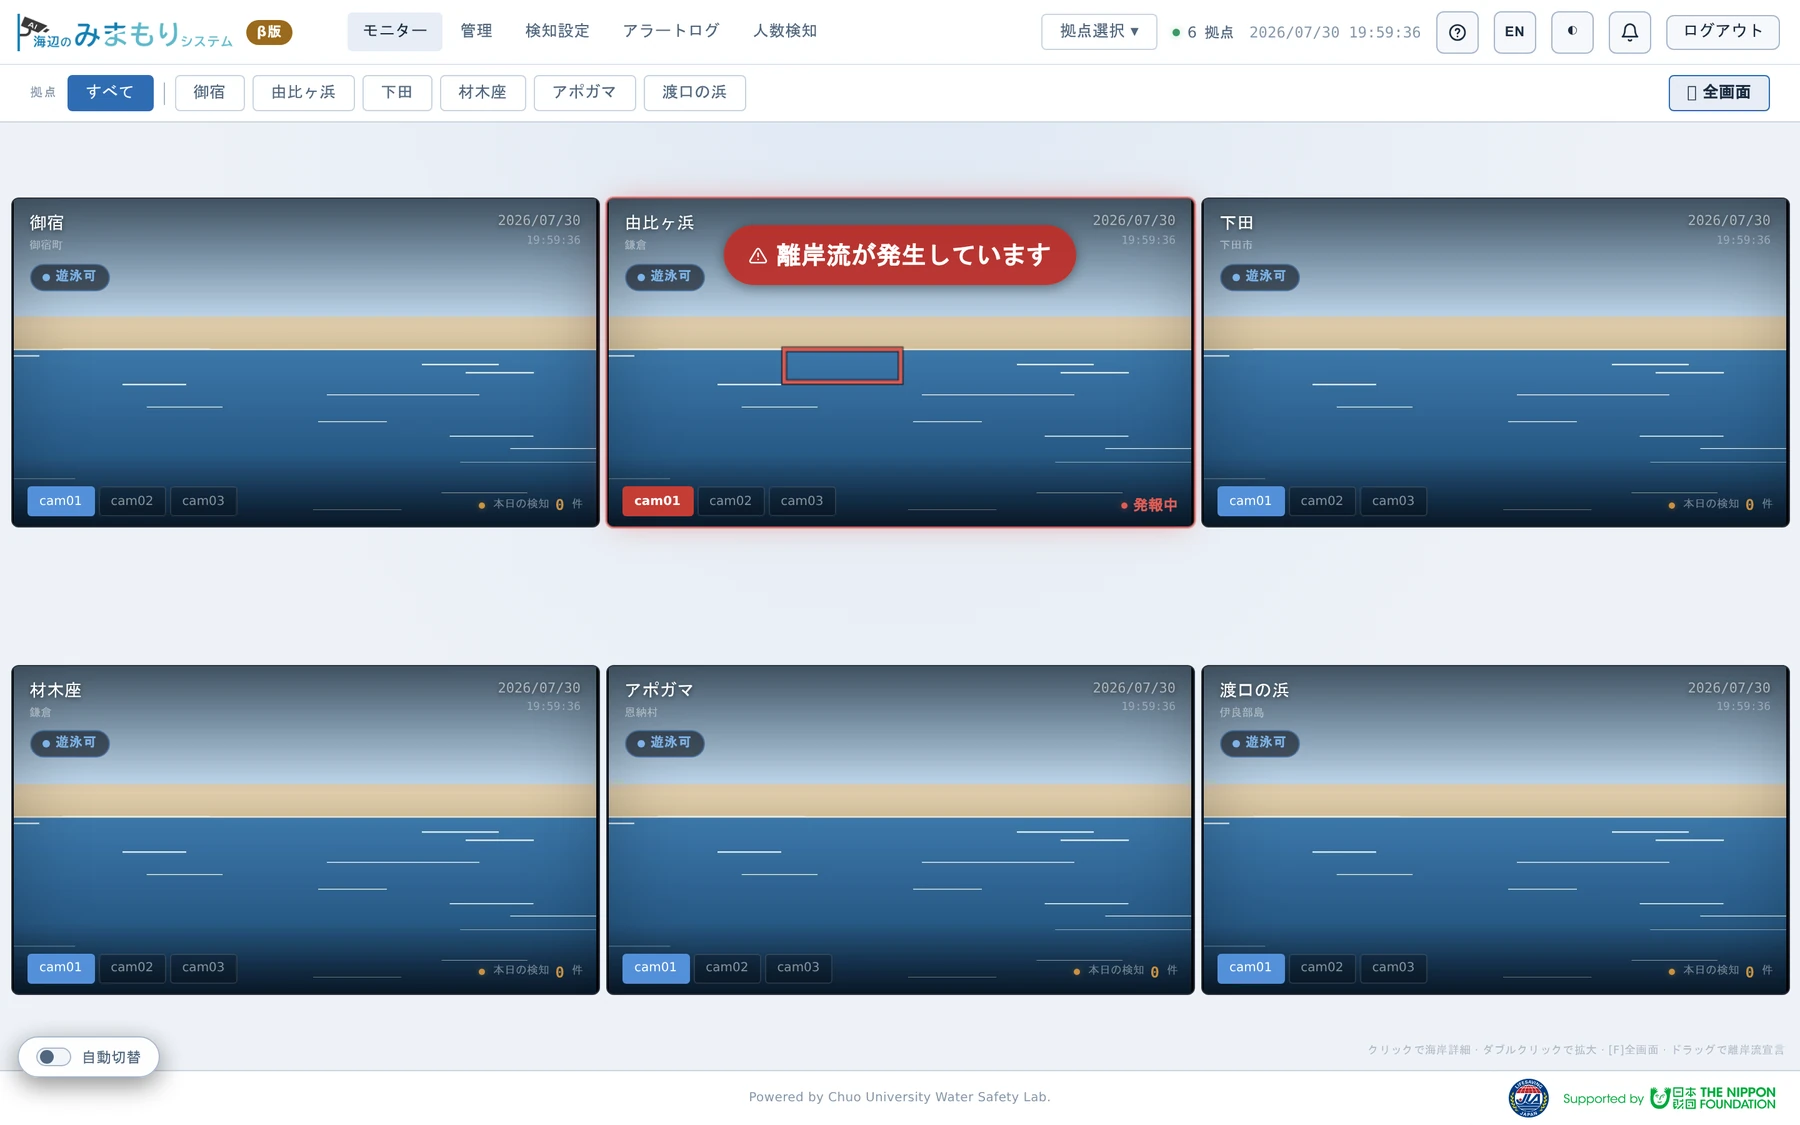
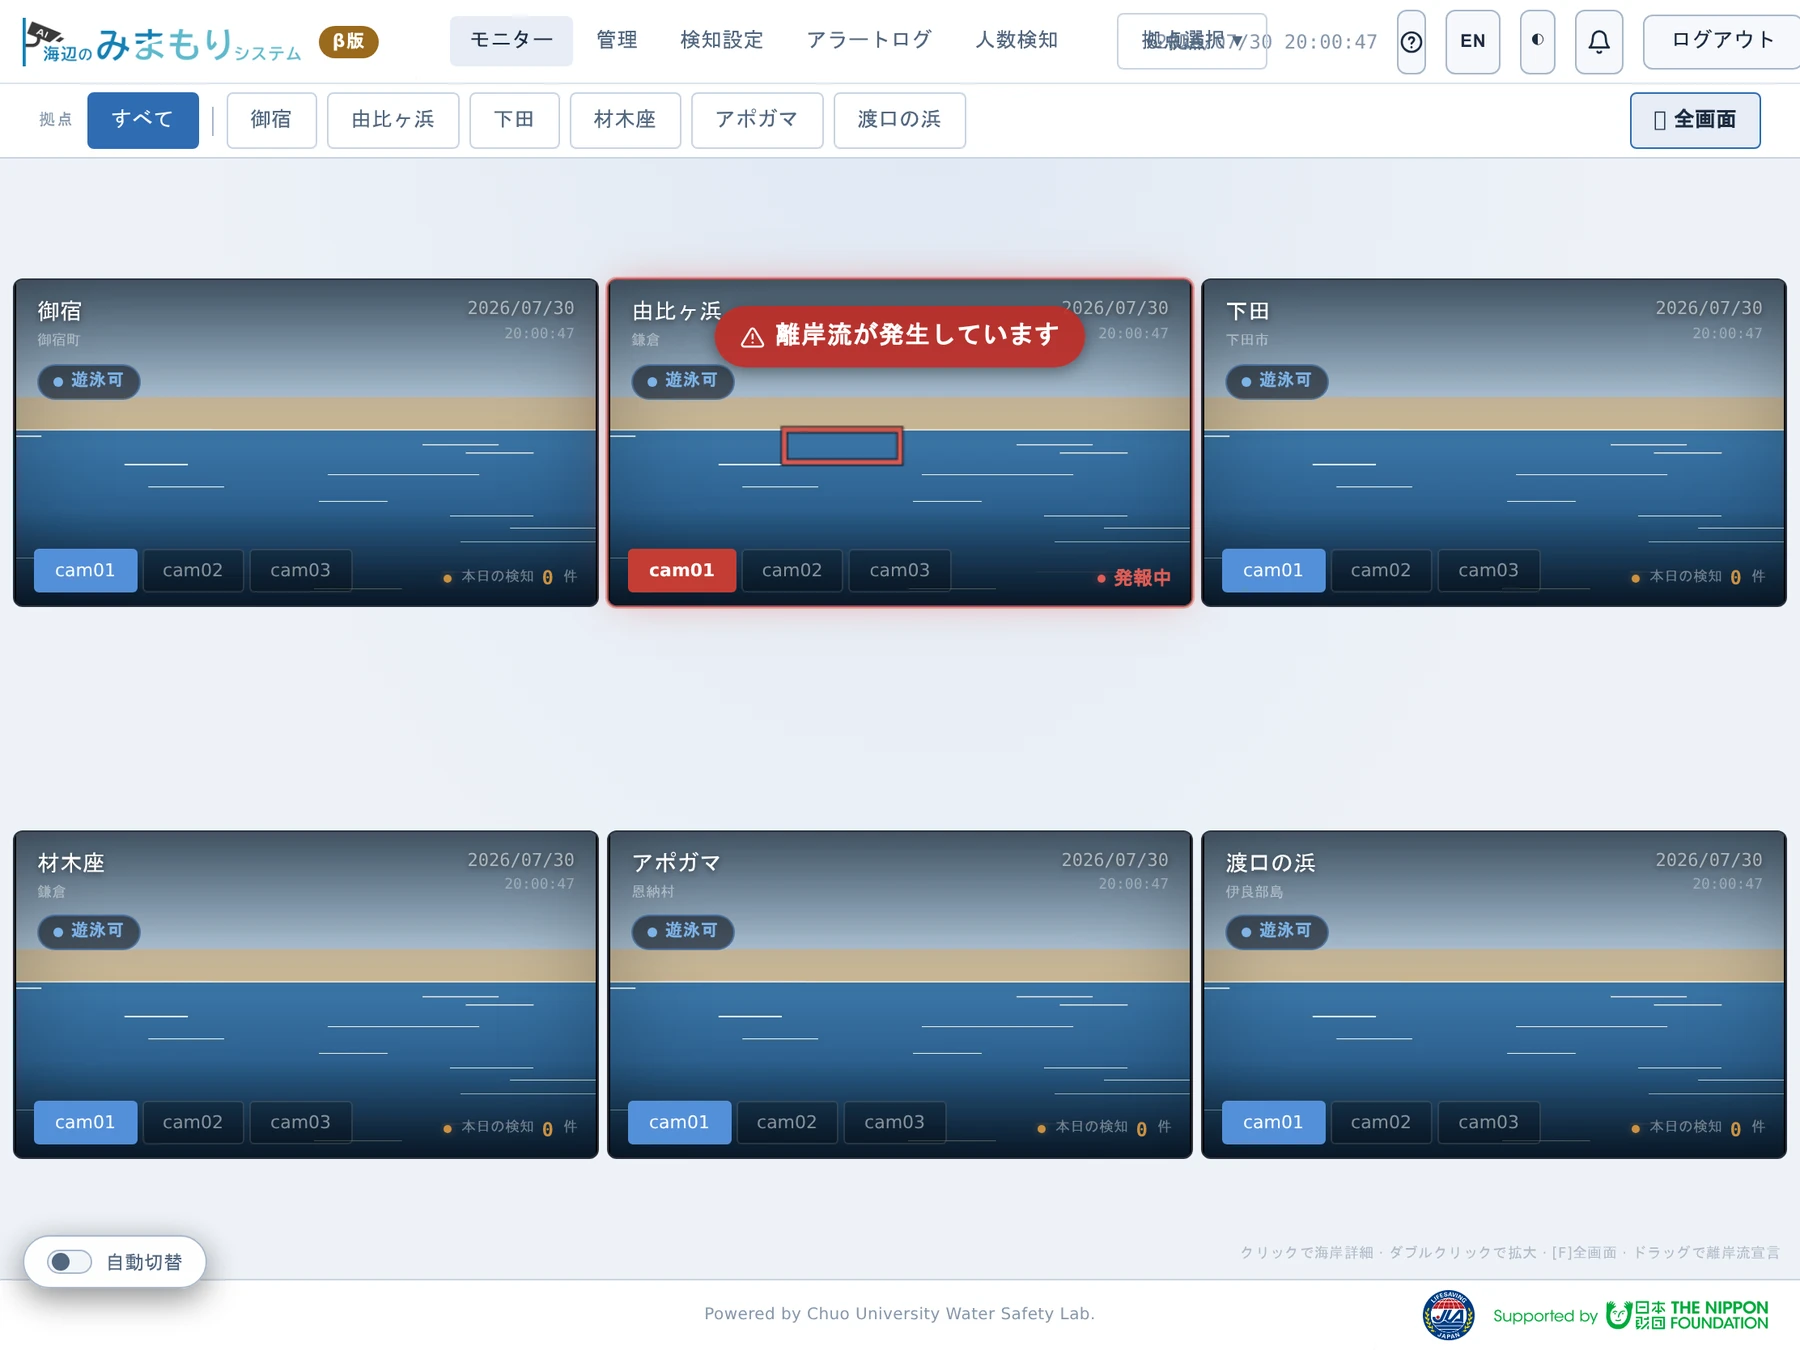
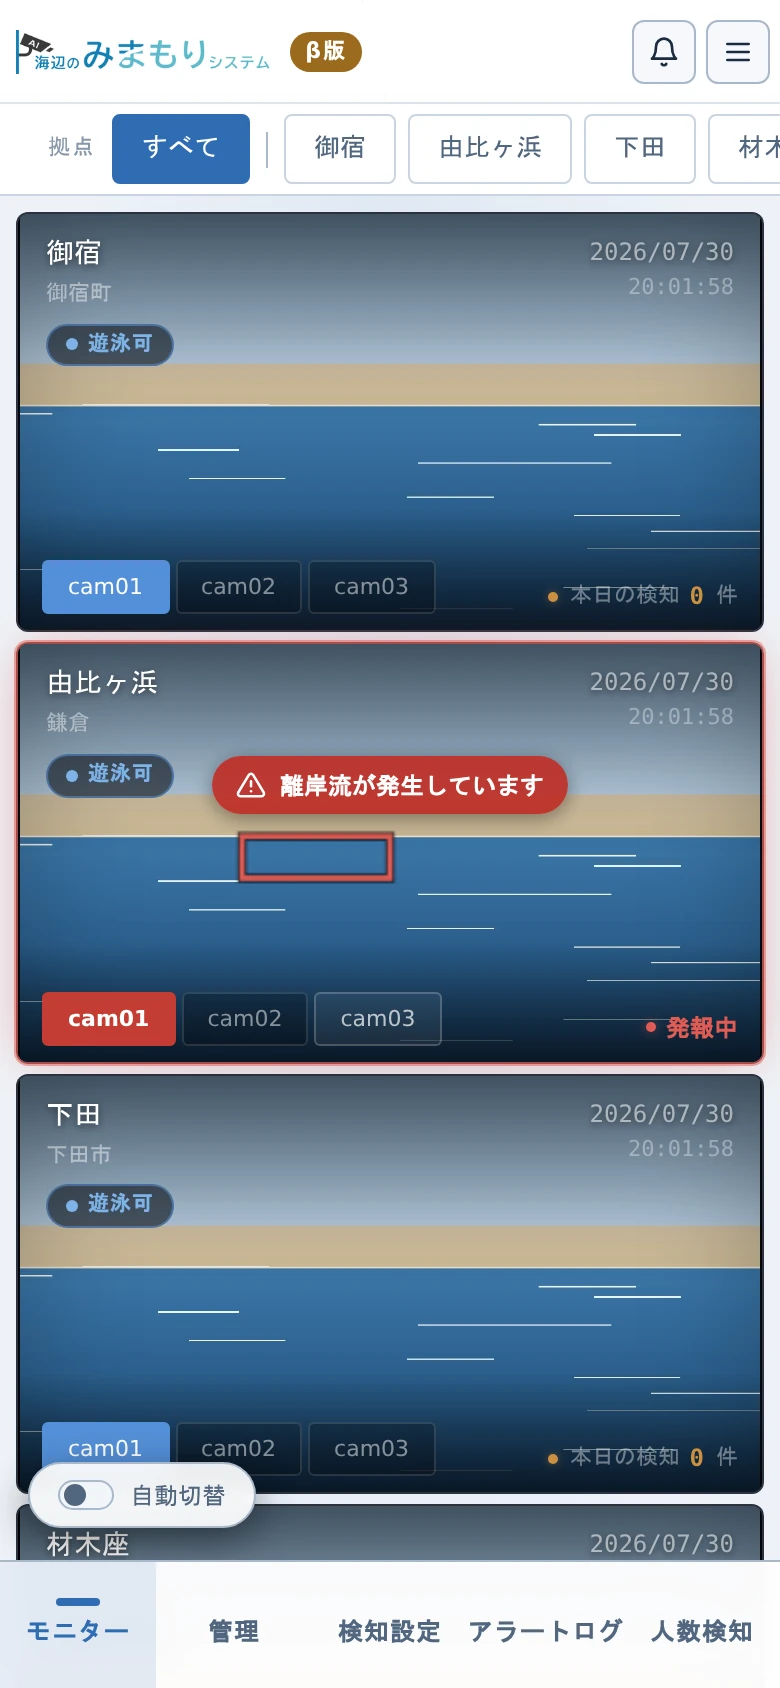
Shows the camera feeds of all beaches side by side. Because beach visitors may also see this screen, person-detection boxes and rescue areas are not displayed.
3.1 What you see
| Display | Meaning |
|---|---|
| Solid red rectangle | Rip current detected by the AI |
| White rectangle | Manually set rip current area |
| ⚠ Rip current detected | Warning shown while a rip current is present on that camera. For AI detections it stays for the "Alert pause" set in Notification settings (default 300 s = 5 min); a manually set area stays until it is cleared |
| Swimming status pill | Swimming permitted / Swim with caution / No swimming |
| "Today" badge | The day's alert count (per camera, cumulative from 0:00). While an alert is active it changes to ALERT |
| Auto cycle switch (bottom left) | Turns the automatic camera rotation (about every 10 seconds) on and off. On by default; shown only with 3 or more beaches (see 3.2) |
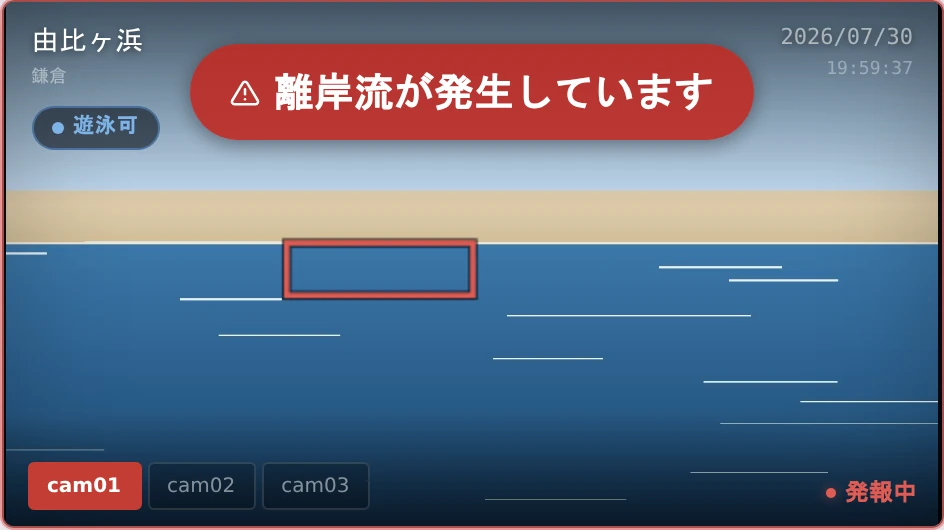
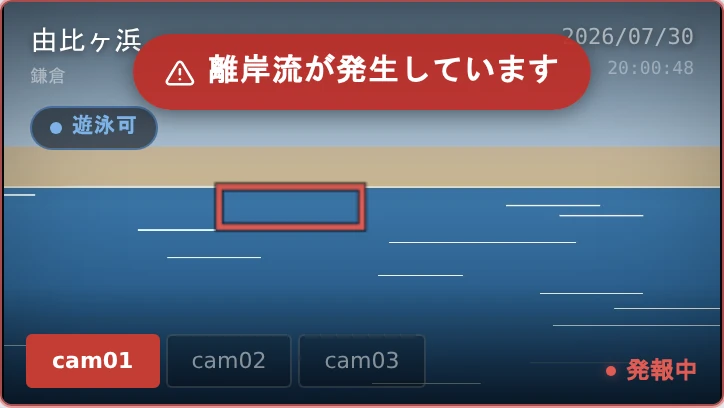
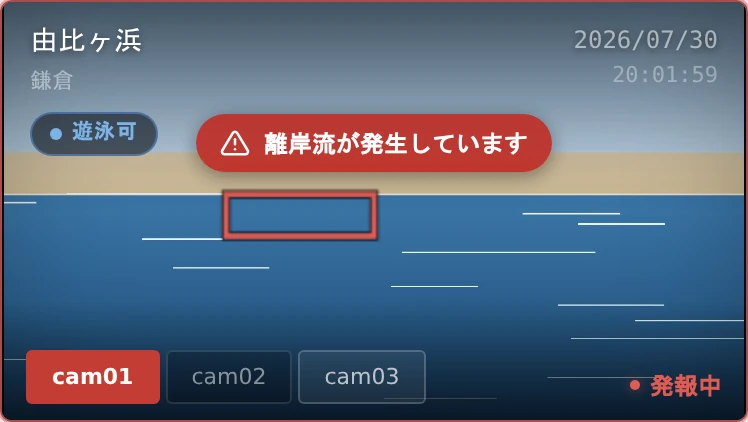
3.2 Operations
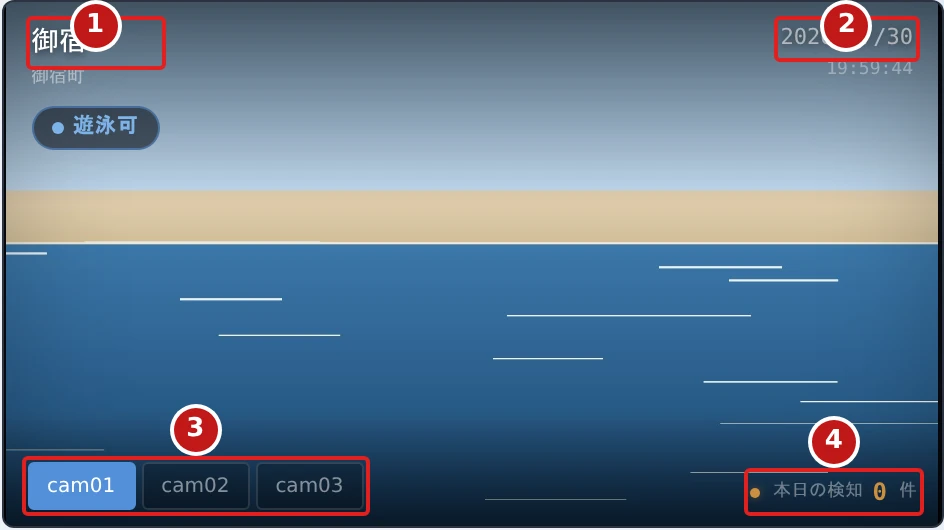
| No. | Item | Description |
|---|---|---|
| 1 | Beach name | Shows which beach this is. The municipality name is just below |
| 2 | Date and time | When the image was captured |
| 3 | Camera tabs | Press cam01, cam02, … to switch to another camera at that beach |
| 4 | Today | The day's alert count (per camera, cumulative from 0:00) |
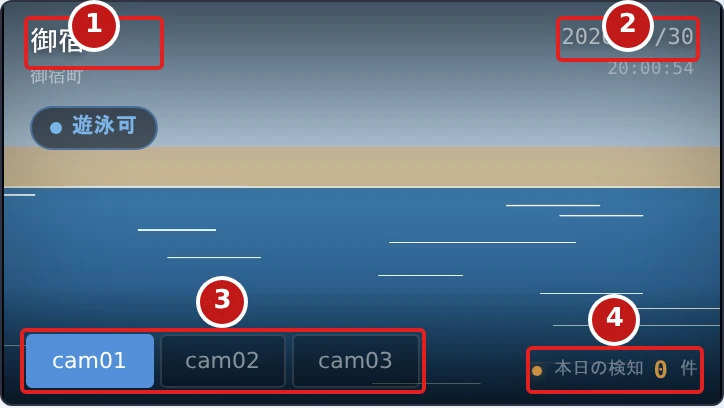
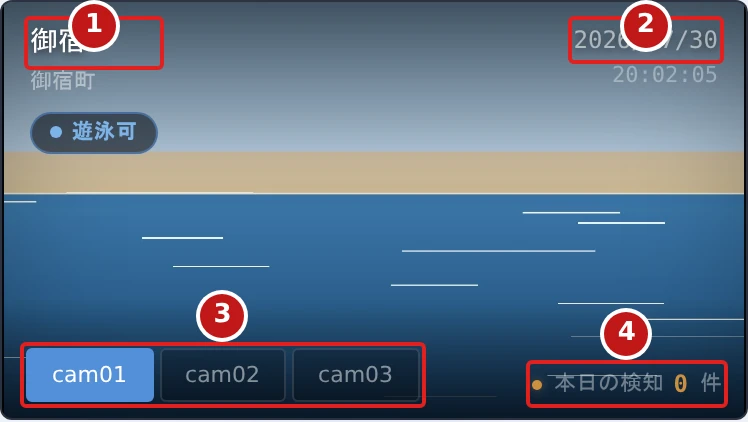
| No. | Item | Description |
|---|---|---|
| 1 | Beach name | Shows which beach this is. The municipality name is just below |
| 2 | Date and time | When the image was captured |
| 3 | Camera tabs | Press cam01, cam02, … to switch to another camera at that beach |
| 4 | Today | The day's alert count (per camera, cumulative from 0:00) |
- Beach bar: select a beach to open its detail screen (next chapter). "All" returns to the wall of all beaches. Monitor always starts on "All" (the wall of every beach). The other screens (Manage, Notifications, Alert log, Visitors) still remember the beach you last chose
- Switching cameras: use the tabs at the bottom left of a card (cam01 / cam02 …)
- Auto cycle: turn on the "Auto cycle" switch at the bottom left to step each card through its cameras about every 10 seconds (cam01 → cam02 → cam03 → cam01 …). Use it to watch every camera hands-free
- The switch appears only when 3 or more beaches are shown (with 1–2 beaches all cameras are already side by side, so there is nothing to cycle)
- It is on by default. Turning it off lasts until the screen is reopened
- Cameras with an active rip current take priority: with one such camera the cycling stops on it; with several, only those cameras are cycled
- With no active rip current, cameras with recent detections are shown first, otherwise the cameras rotate in order
- Switching a tab by hand does not stop the cycling — the next step comes about 10 seconds later. To stay on one camera, turn Auto cycle off
- Full screen: the button at the right end of the beach bar. Useful for permanent display
- Pressing a card: opens that beach's detail (signage) screen
- Double-clicking a card (double-tap on a phone or tablet): enlarges the card. Repeat to go back
- The F key also toggles full screen
- Drag on the video to raise a rip current alert for that region (manual declaration)
Declaring a rip current by tracing the video with a finger is not available. This prevents a swipe meant to scroll the page from raising an alert by mistake. To report a rip current manually, set it from the rip current area on the Manage screen. Setting it there raises the same alert.
4. Beach detail / Signage (/signage/{beach})
The screen shown to beach visitors. It lists every camera of one beach together with the swimming status, conditions, and notices.
- The swimming status is a flag icon (blue = Swimming permitted / yellow = Swim with caution / red = No swimming)
- Shows air temperature, water temperature, waves, wind, and tide times (air temperature, waves, and wind are fetched automatically from JMA)
- Shows beach news and notices as a bulleted list
- Shows the Water Safety App (JLA) QR codes (iOS / Android) at the bottom right
- Cameras with an active rip current show ⚠ Rip current detected overlaid
- Manually set rip current areas (white rectangles) are shown; rescue areas are not
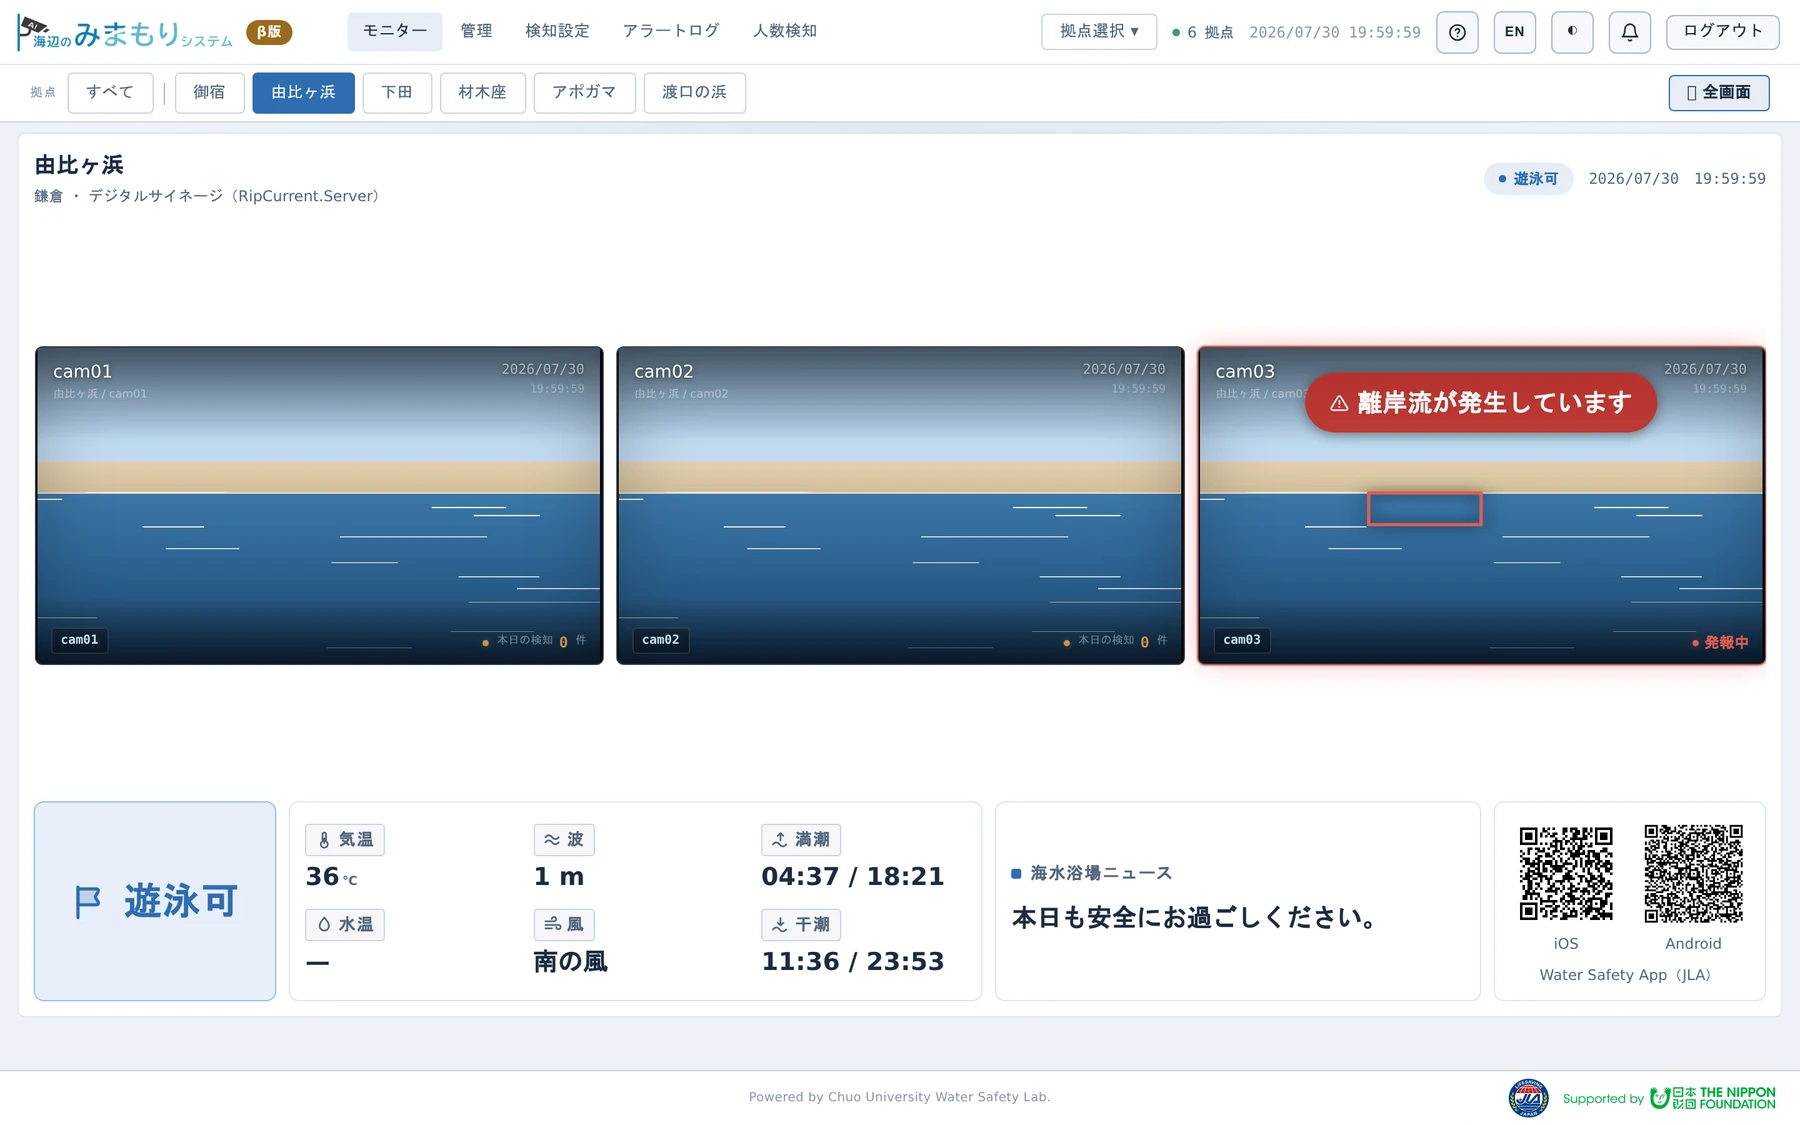
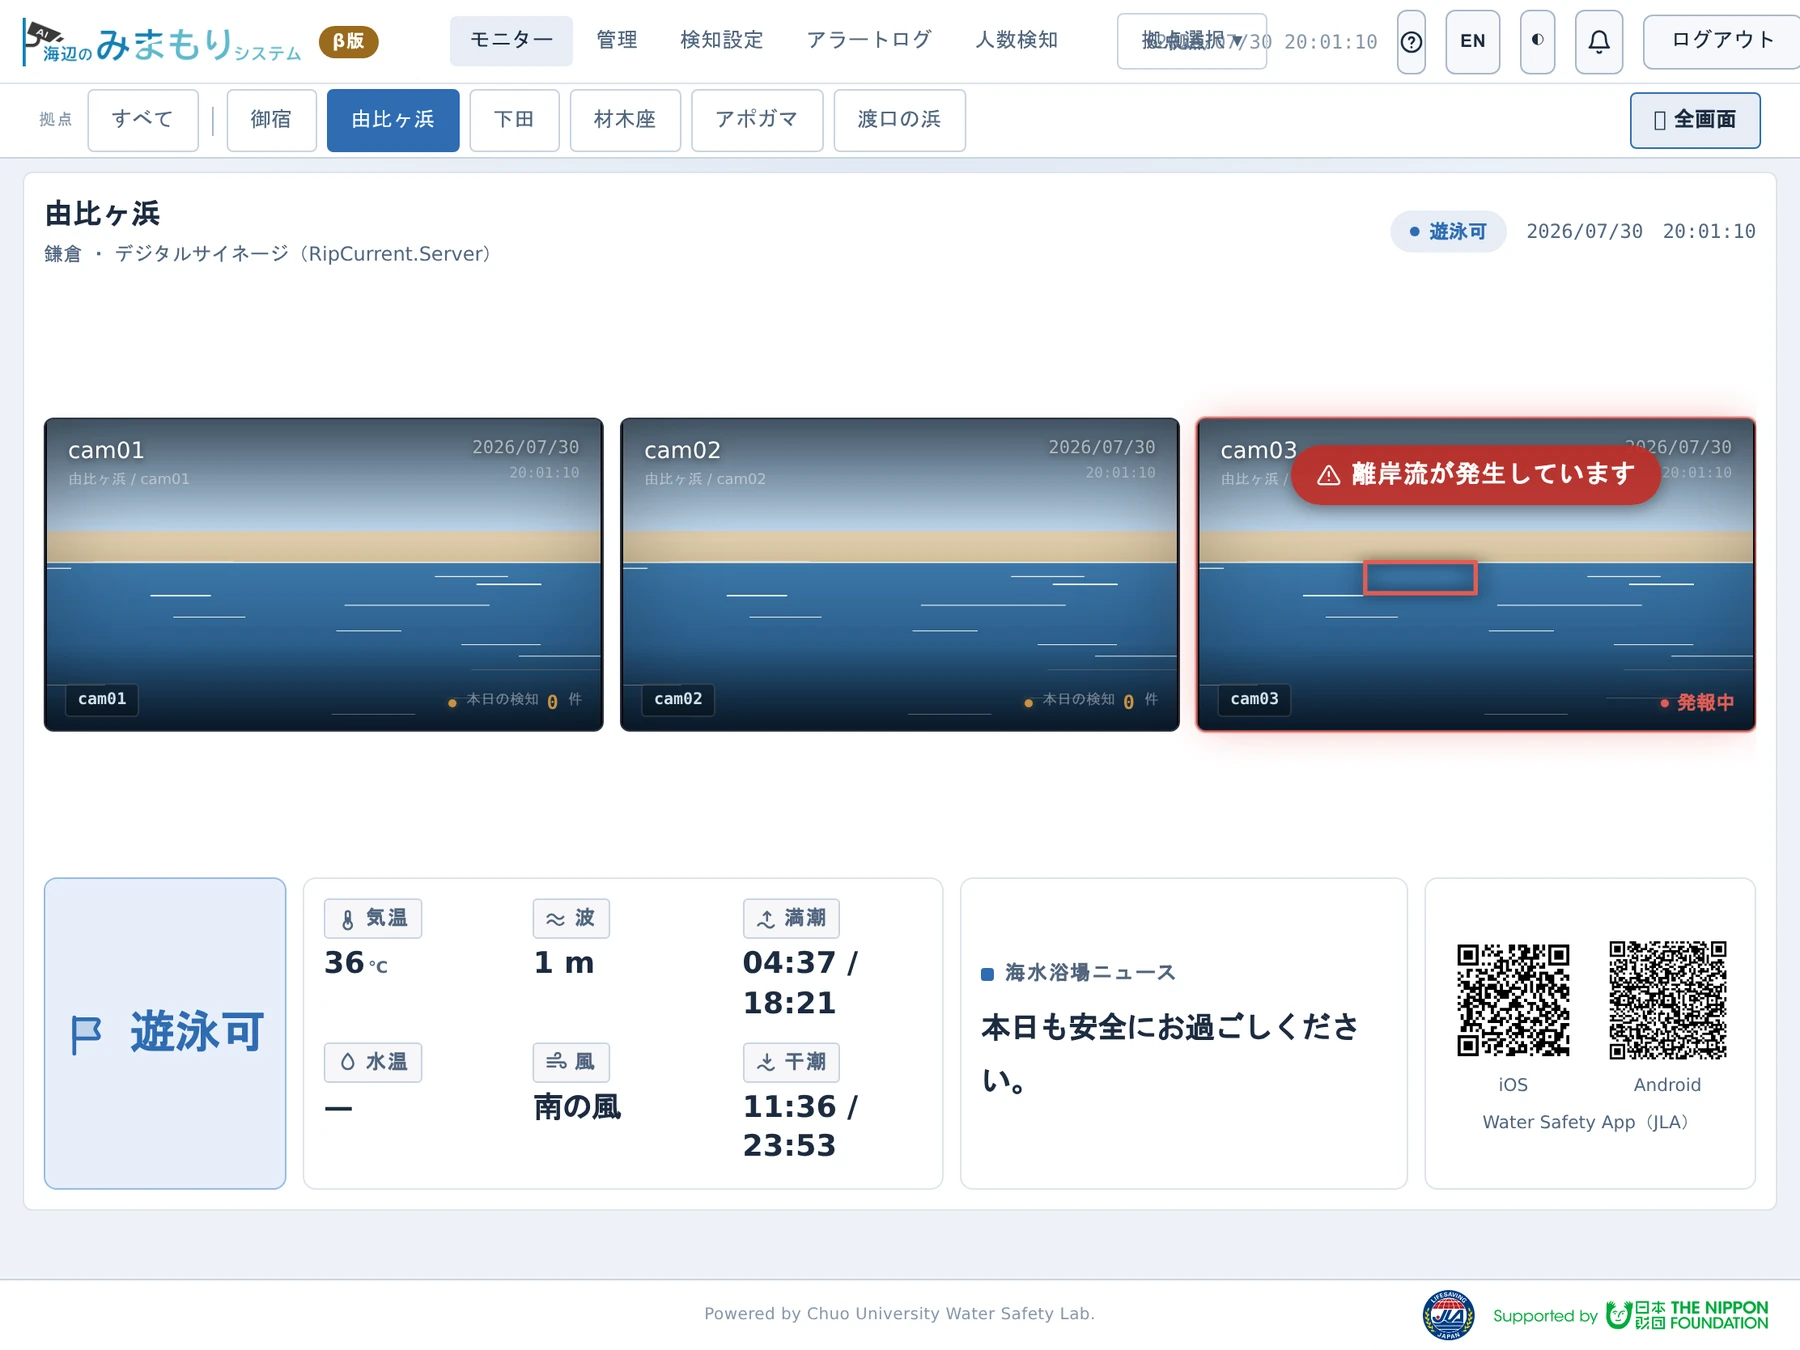
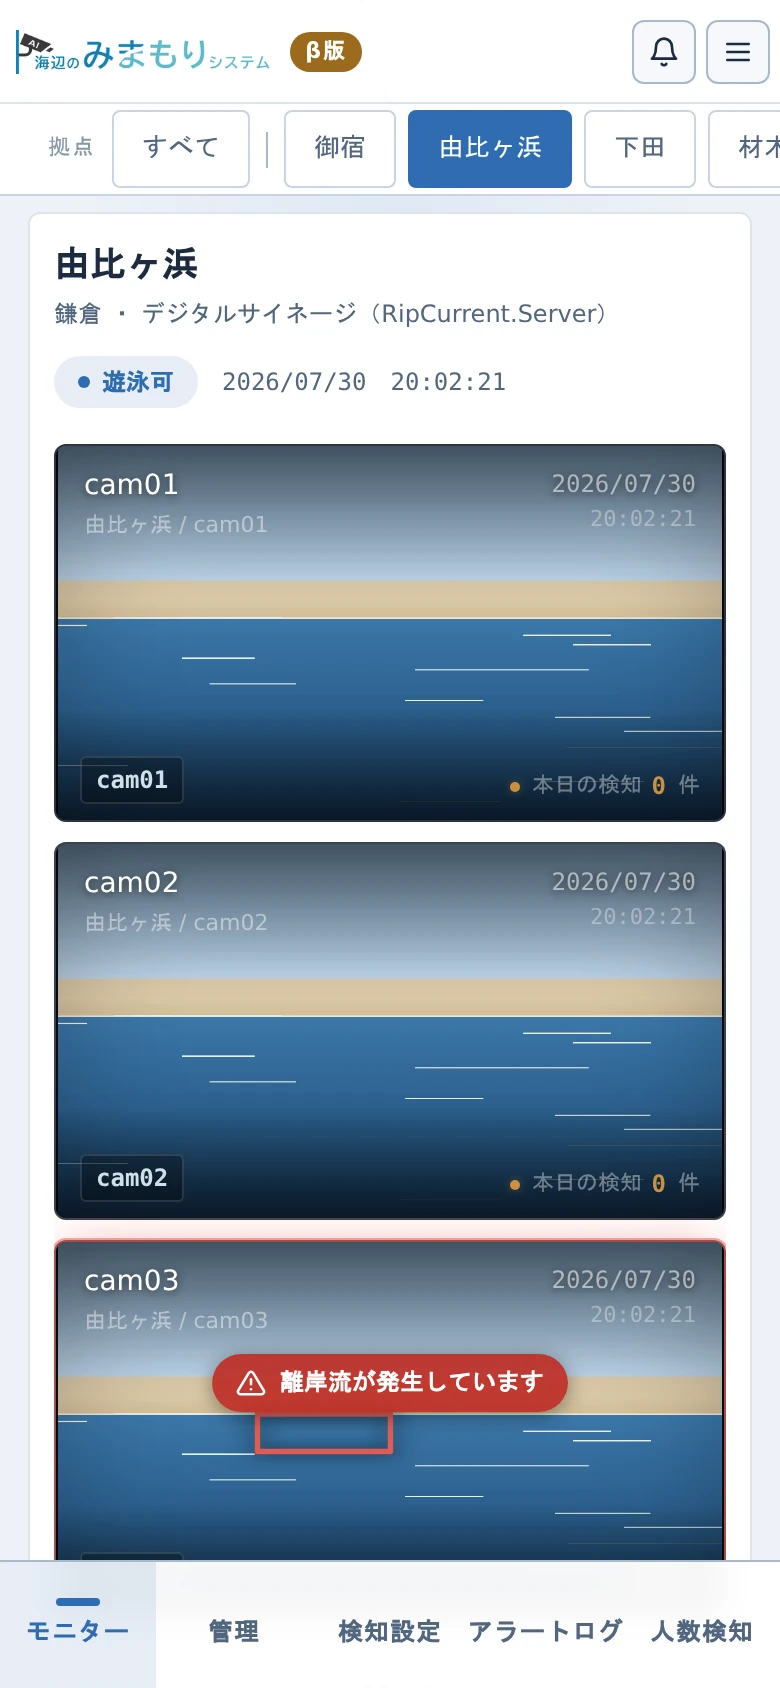
This screen is read-only. There are no settings to change here.
5. Manage — Responding to alerts (/manage)
The screen for day-to-day operations. Corresponds to the legacy "RipCurrent.Client app monitoring screen".
When an alert is raised, buttons appear directly below the camera image concerned.
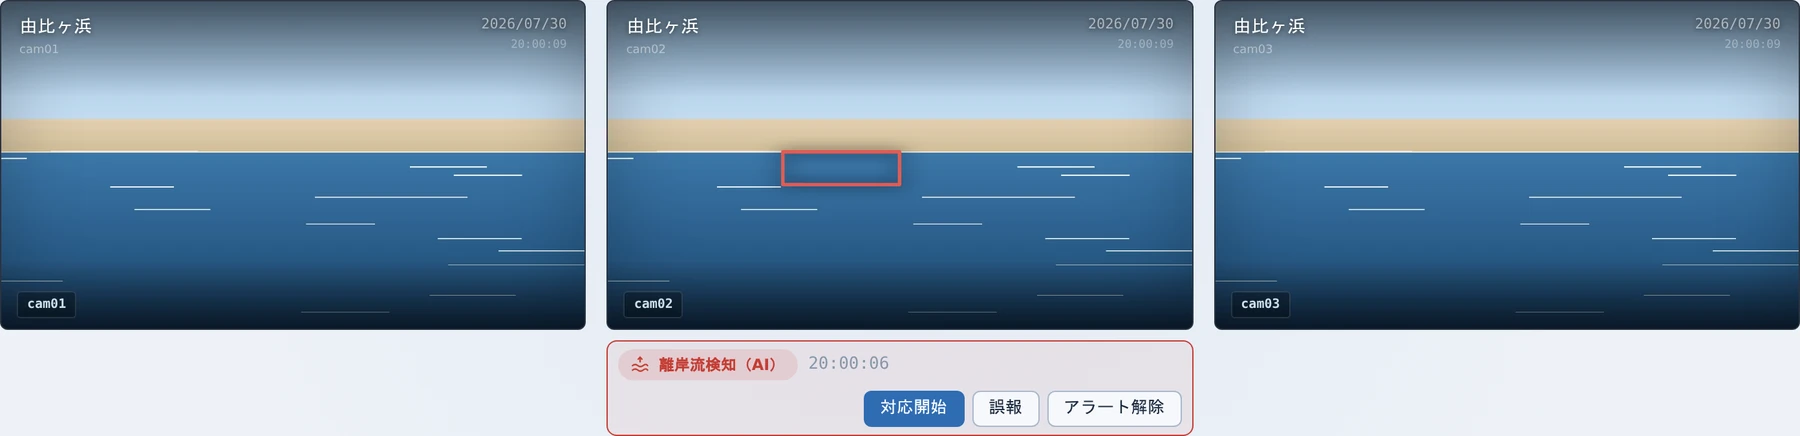
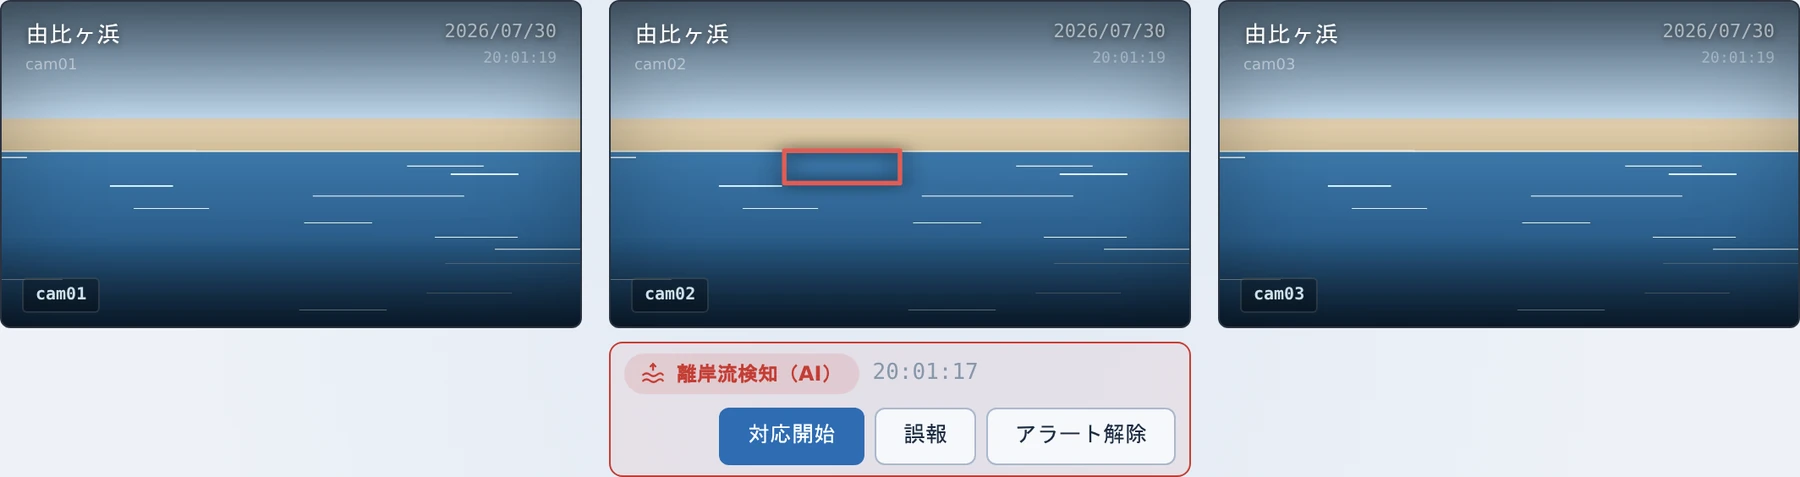
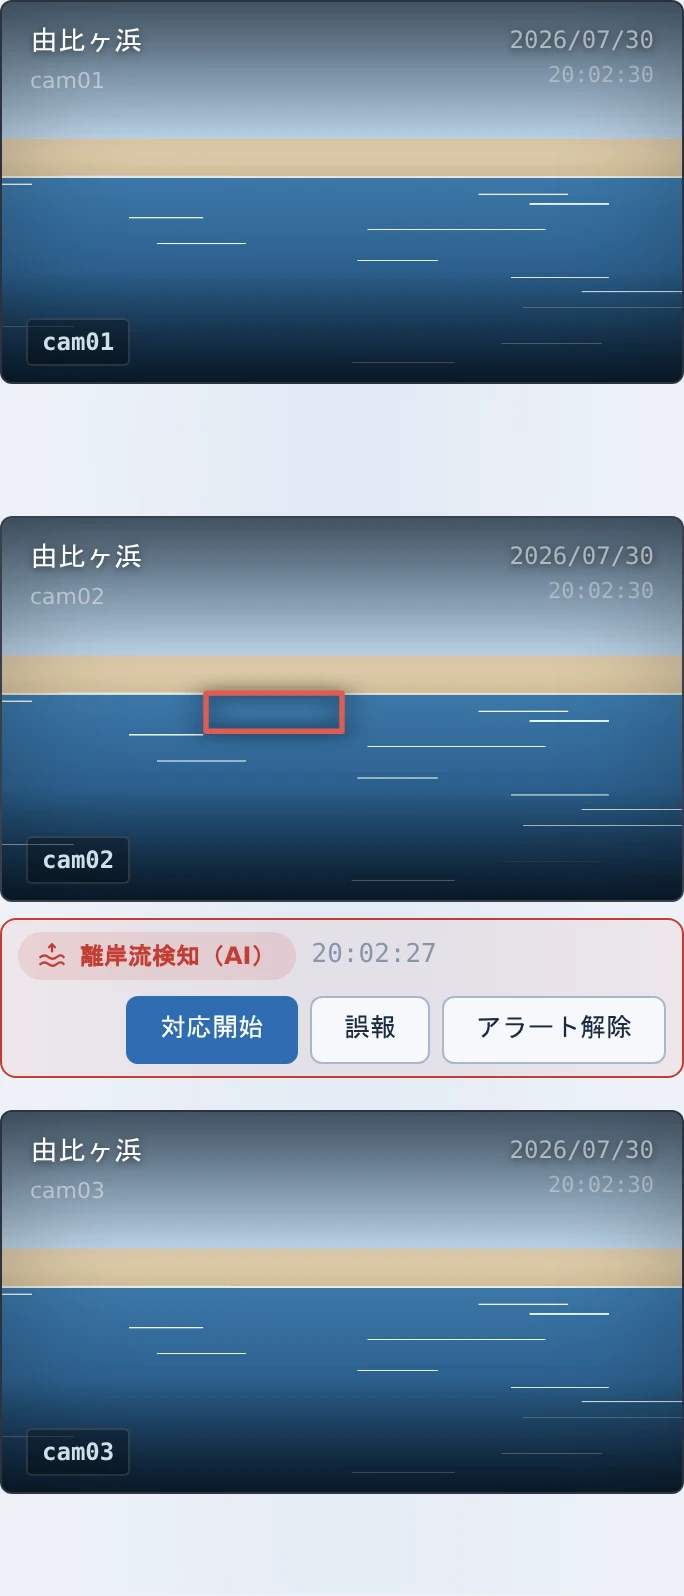
| Button | What it does |
|---|---|
| Start response | Records the time you acknowledged the situation and started responding |
| False alarm | Closes the alert as a false alarm. The rip current area (white rectangle) on that camera is also removed |
| Clear alert | Closes the alert once the response is over. The rip current area (white rectangle) on that camera is also removed |
- Only current alerts (raised within the last 10 minutes) are shown. Older ones disappear from this screen, but the records remain in the Alert log
- The same space is reserved even while there is no alert, so the cameras do not shift when alerts appear or clear
6. Manage — Setting a rip current area manually
You can mark a region you judge dangerous yourself (one per camera). Corresponds to section 4.1 of the legacy manual.
6.1 Setting an area
- In "Rip current area (manual)", press Draw area in the row for the camera
- Drag on the camera image to draw a white rectangle
- Press Apply. Notifications start
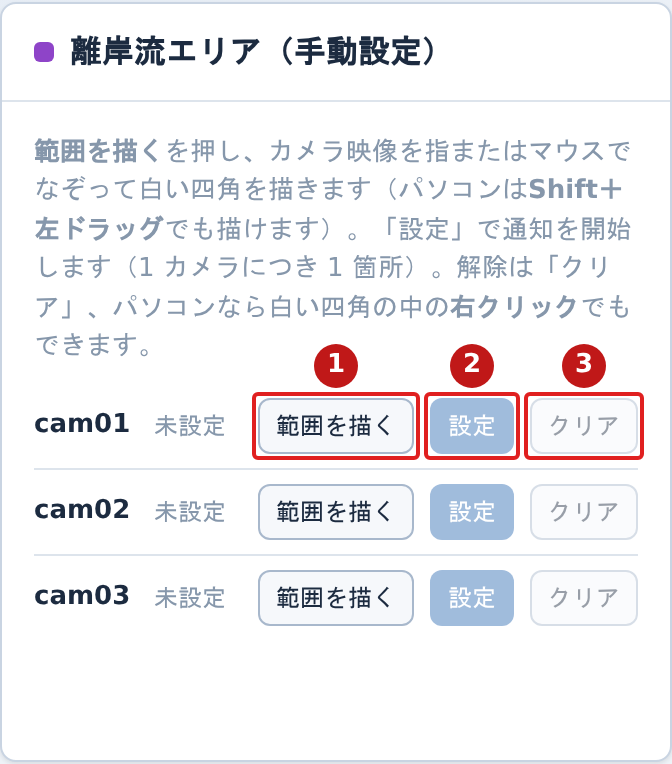
| No. | Item | Description |
|---|---|---|
| 1 | Draw area | Enters drawing mode. Press it, then trace the image |
| 2 | Apply | Starts notifying with the drawn region. Nothing is sent until you press it |
| 3 | Clear | Discards the draft, or clears an applied area |
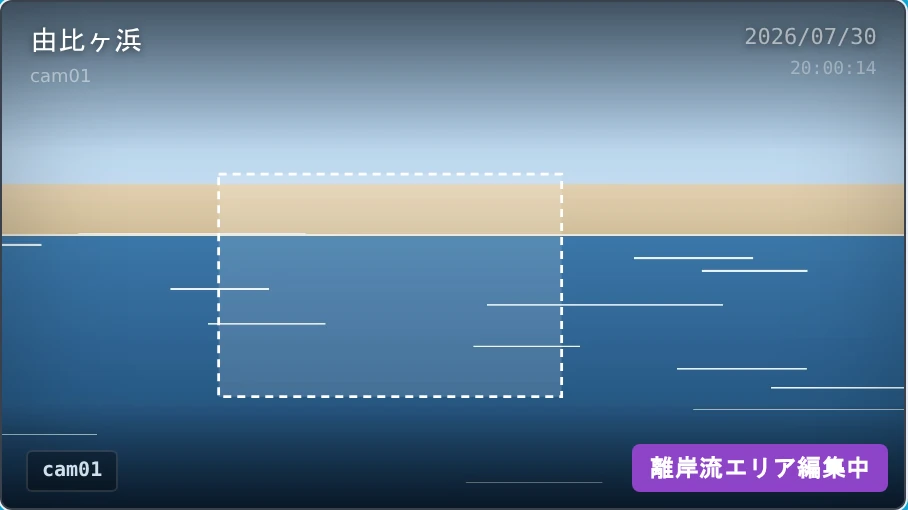
Shift+left-drag also draws, without pressing Draw area.
- In "Rip current area (manual)", press Draw area in the row for the camera
- Trace the camera image with a finger to draw the white rectangle
- Press Apply. Notifications start
- Press Stop drawing so you can scroll over the video with a finger again
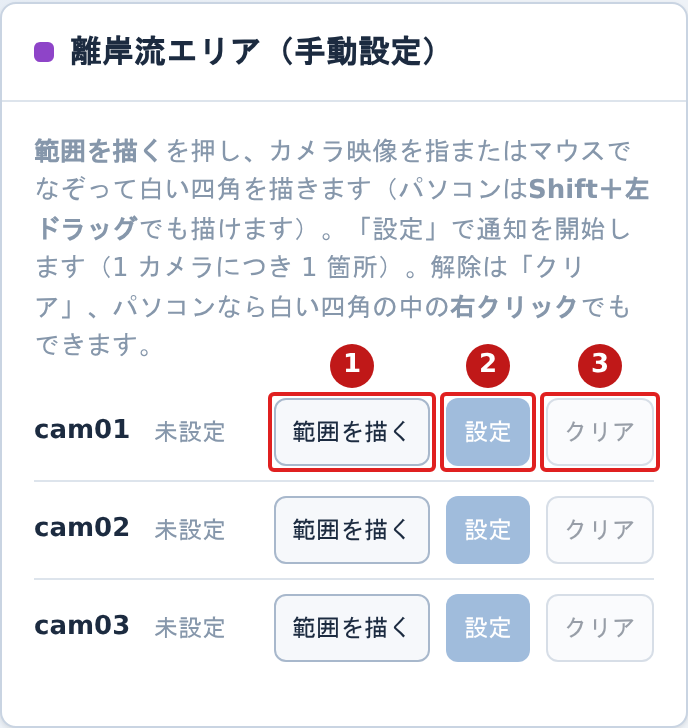
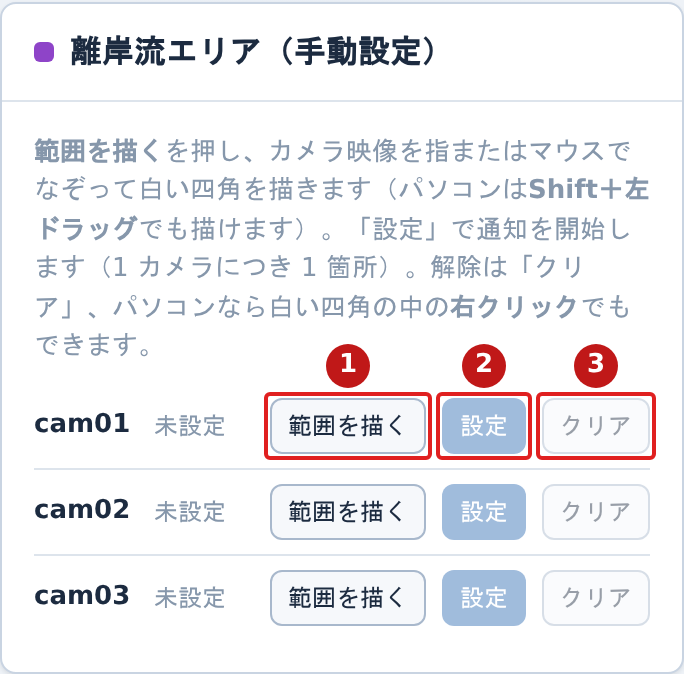
| No. | Item | Description |
|---|---|---|
| 1 | Draw area | Enters drawing mode. Press it, then trace the image |
| 2 | Apply | Starts notifying with the drawn region. Nothing is sent until you press it |
| 3 | Clear | Discards the draft, or clears an applied area |
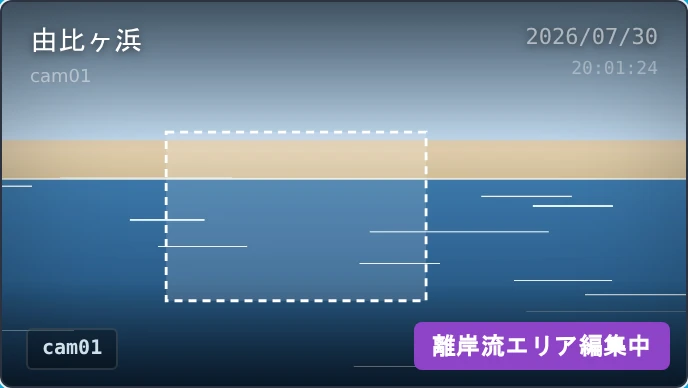
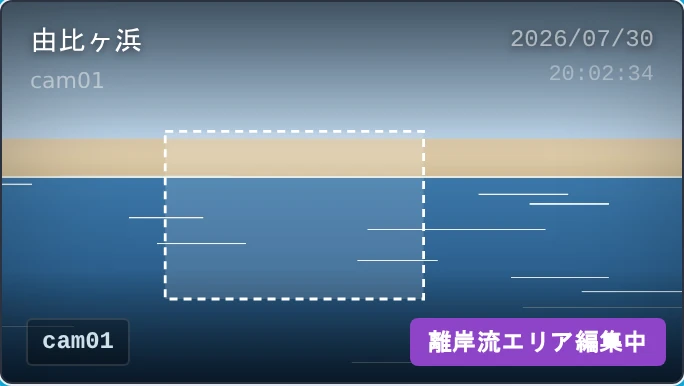
No Shift key is needed. The page does not scroll while you are drawing.
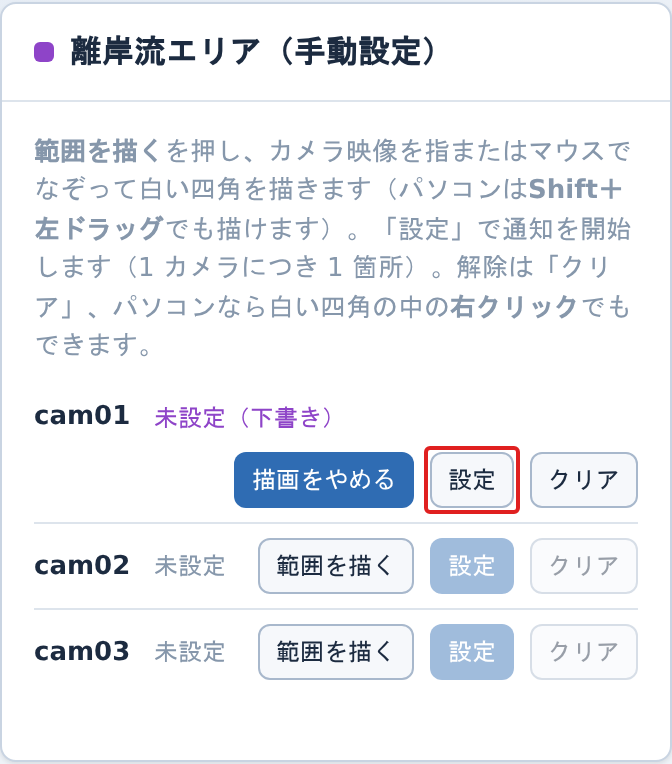
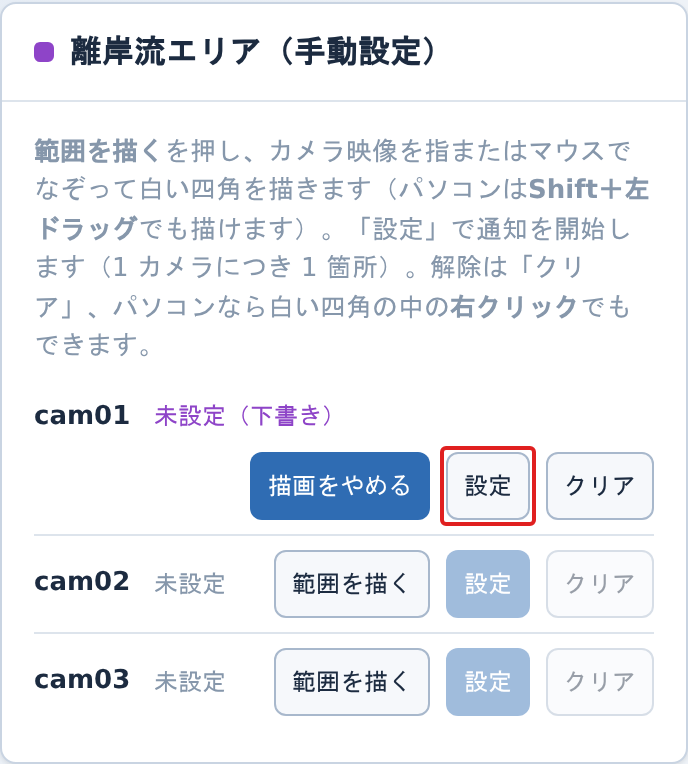
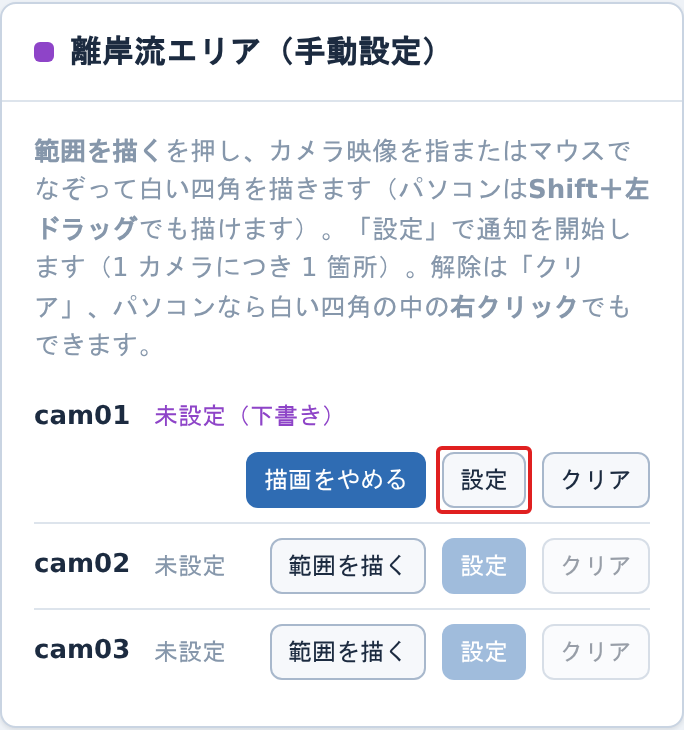
Nothing is notified until you press Apply. To redraw, simply trace again. The camera in drawing mode shows an Editing rip current area tag at the bottom right of the image.
6.2 Clearing it
Press Clear. A confirmation dialog appears. On a PC you can also right-click inside the white rectangle to clear it.
6.3 What starts when you apply it
- The warning on the signage and monitor (⚠ Rip current detected)
- Notifications to LINE and lifesaver smartwatches (with the detection image — the same one shown in the Alert log)
- Detection of people entering the white rectangle
- The alert in the response row of the Manage screen
- Saving the camera image of that moment (with the white rectangle) — shown under "Detection images" in the Alert log
7. Manage — Setting the rescue area
Define the region to watch (a polygon), and lifesavers are notified when a person is detected inside it. Corresponds to section 4.3 of the legacy manual.
7.1 Setting an area
- In "Rescue area", press Edit area in the row for the camera
- Click on the camera image to place vertices and draw the boundary
- Click the first point or press Done. Three or more points complete the area
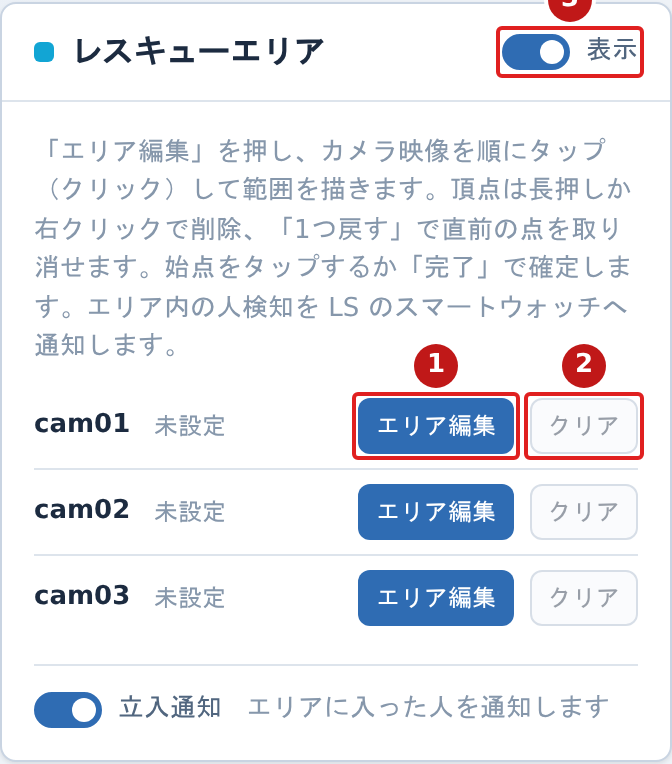
| No. | Item | Description |
|---|---|---|
| 1 | Edit area | Place vertices to draw the boundary. Pressing it again turns it into "Done" |
| 2 | Clear | Clears the applied area |
| 3 | Show | Toggles whether saved areas are overlaid on the camera images on this screen |
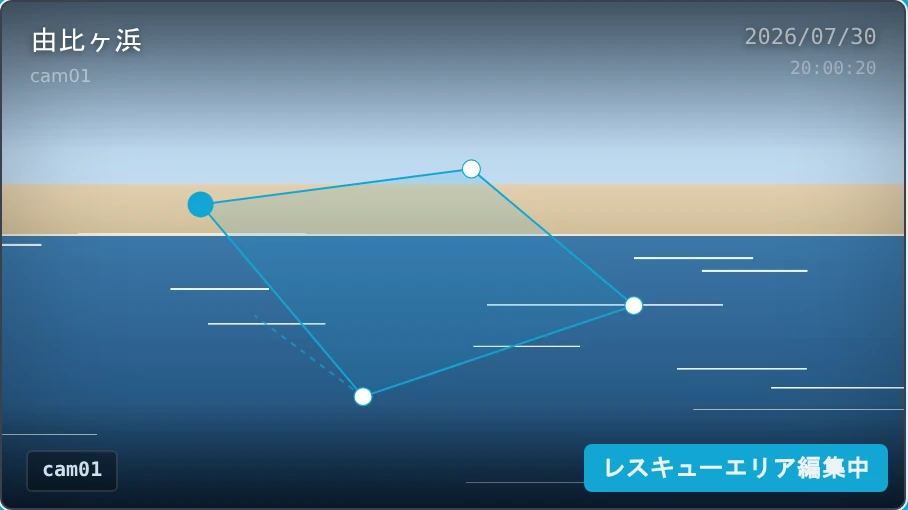
Right-click a vertex to delete it, or press Undo point to remove the last one. Vertices can be dragged. Press Esc to leave editing.
- In "Rescue area", press Edit area in the row for the camera
- Tap the camera image point by point to place vertices and draw the boundary
- Tap the first point or press Done. Three or more points complete the area
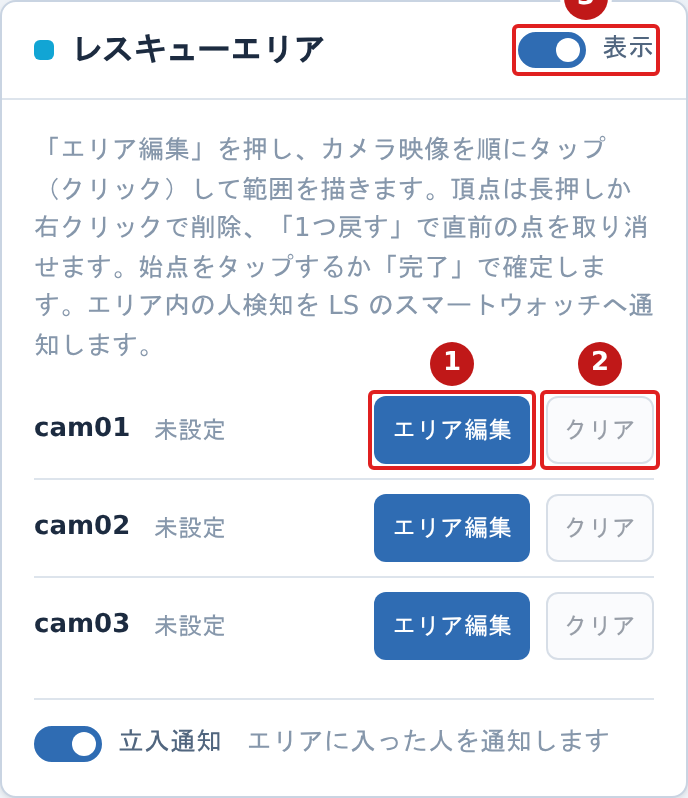
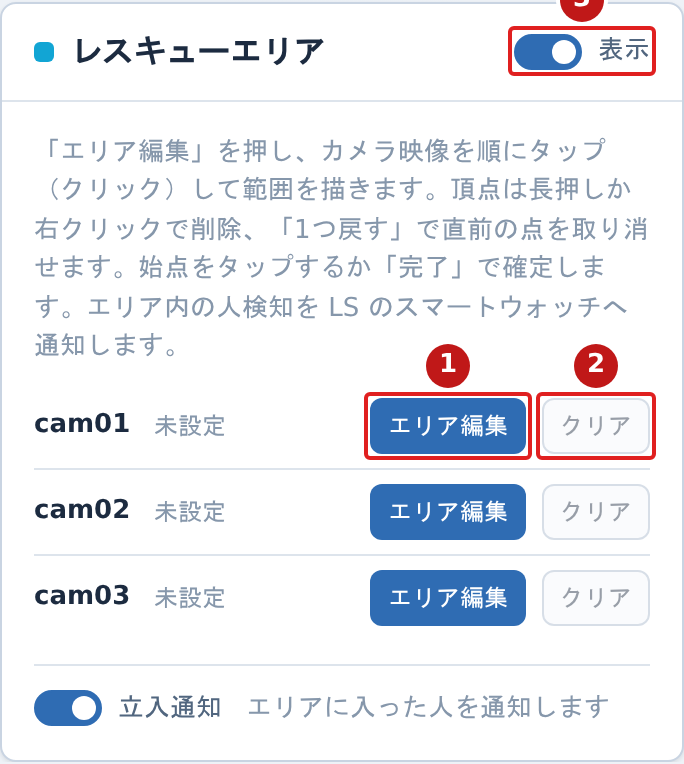
| No. | Item | Description |
|---|---|---|
| 1 | Edit area | Place vertices to draw the boundary. Pressing it again turns it into "Done" |
| 2 | Clear | Clears the applied area |
| 3 | Show | Toggles whether saved areas are overlaid on the camera images on this screen |
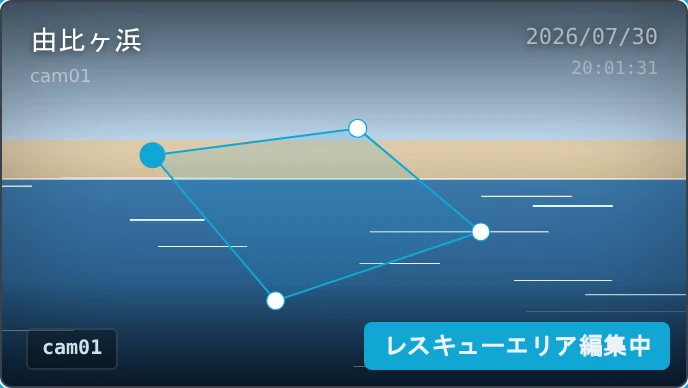
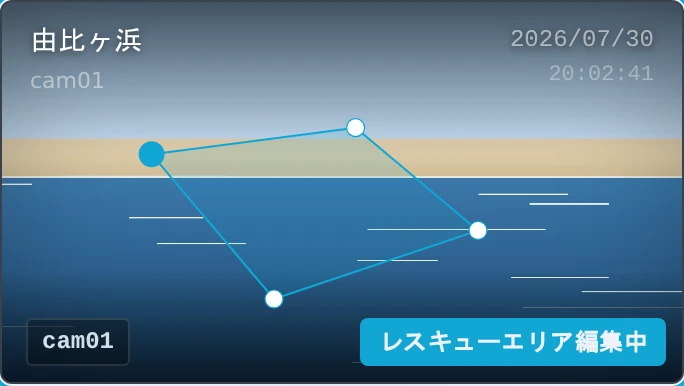
Long-press a vertex (about 0.5 s) to delete it, or press Undo point to remove the last one. Vertices can be moved with a finger.
7.2 Clearing it
Press Clear. A confirmation dialog appears.
7.3 What starts when you apply it
- "Rescue area set" enters the notification center, together with the camera image of that moment
- When a person is detected inside the area, lifesaver smartwatches and the notification center are notified
- On this screen, people inside the watched area are shown with a red box. Clearing the area removes the boxes immediately
- The switch at the top right of the card toggles the rescue area overlay on the video
8. Manage — Swimming status, water temperature, and notices
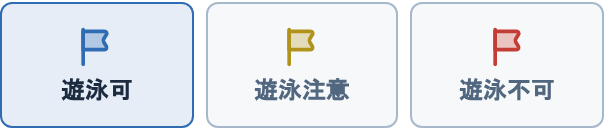
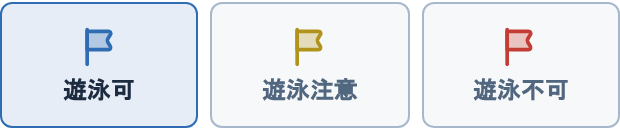
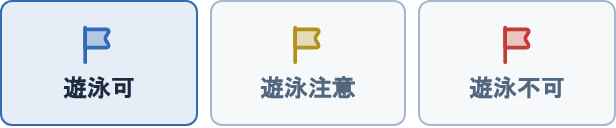
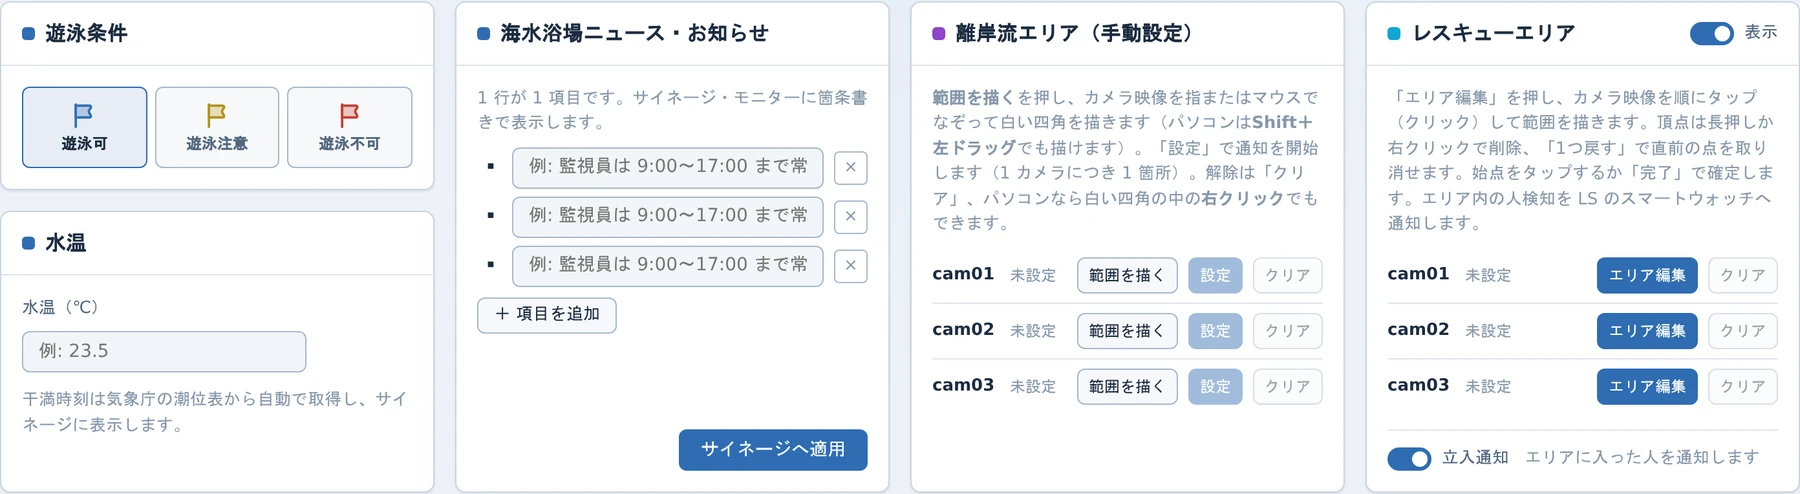
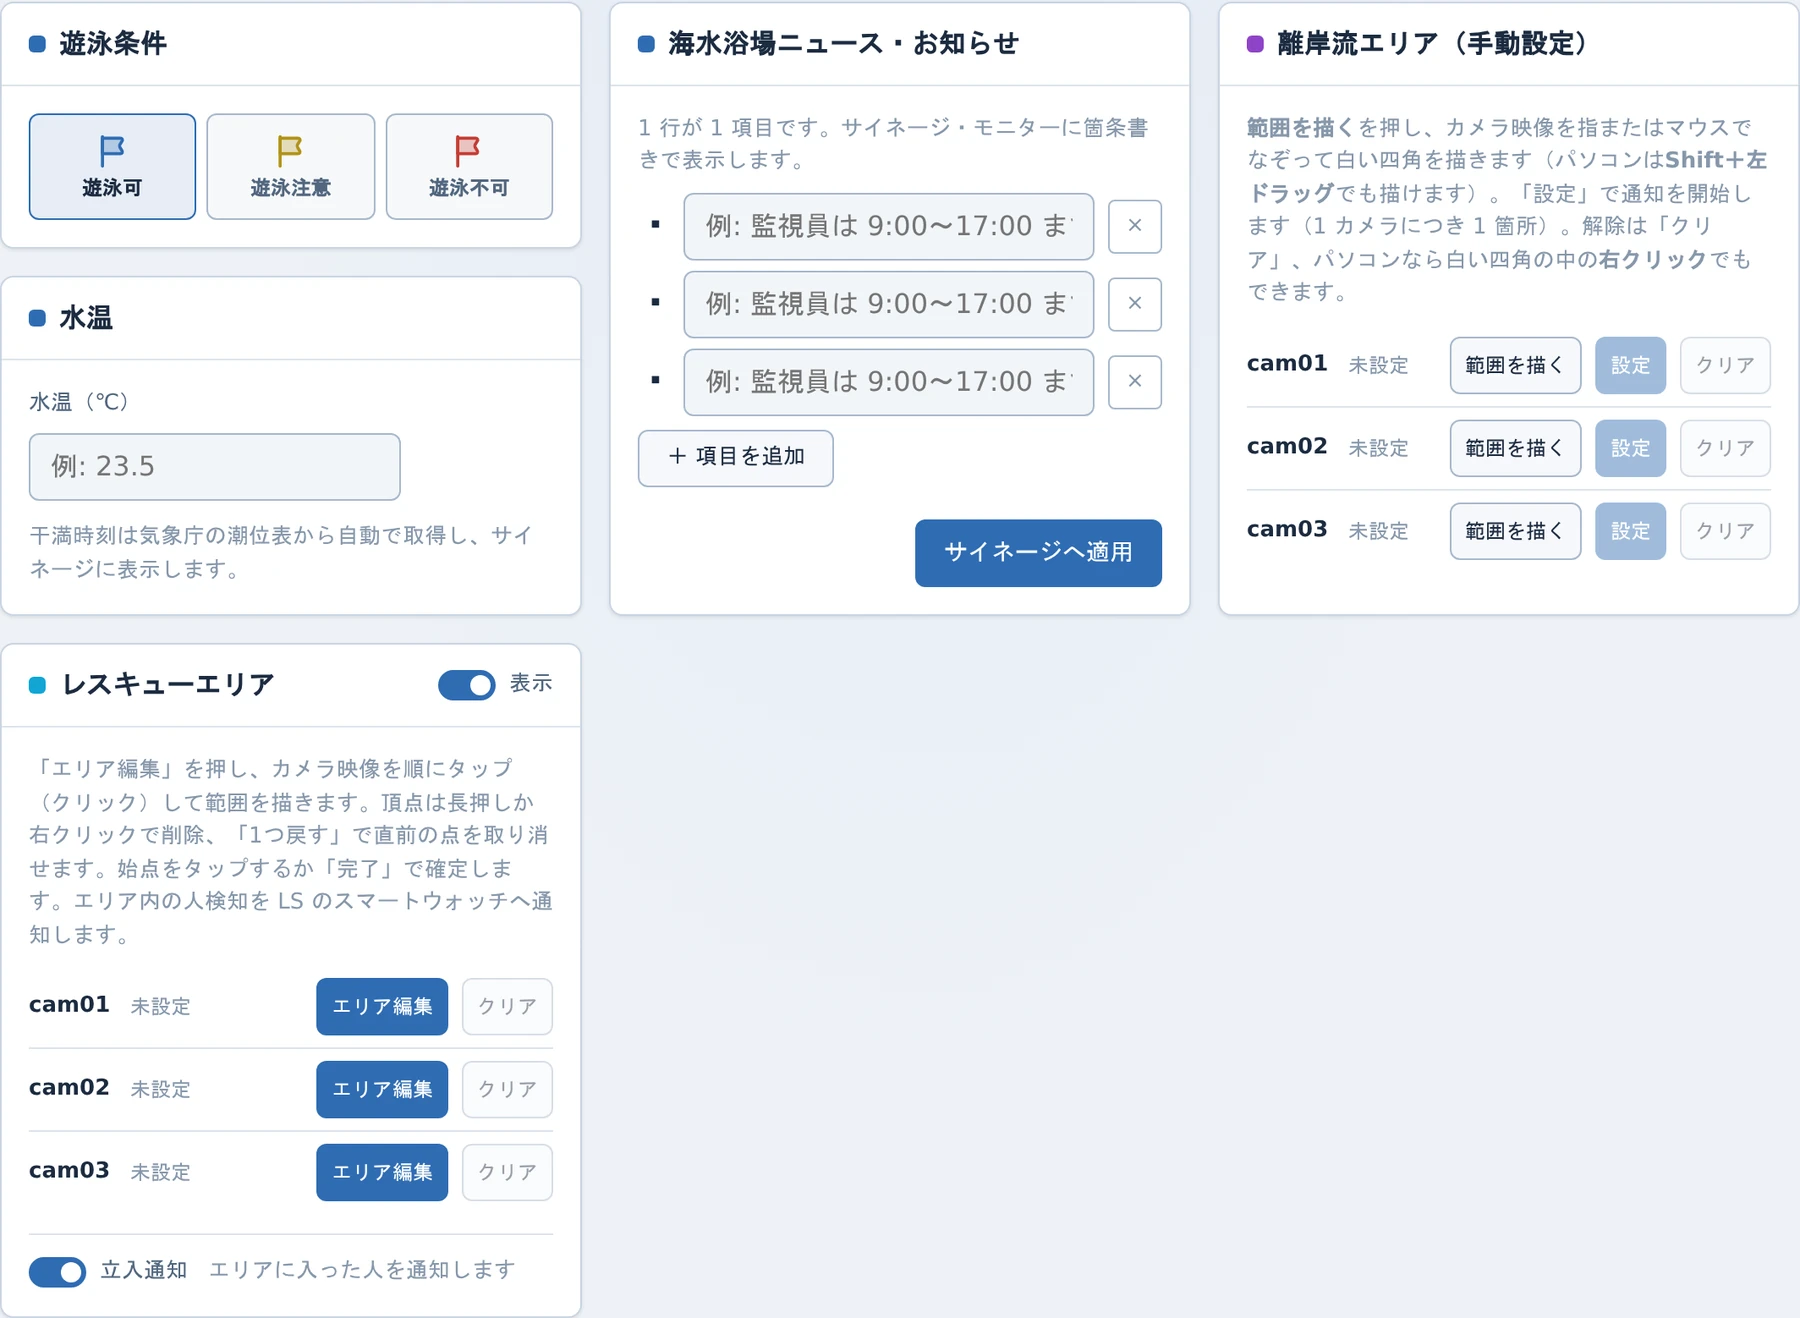
- Choose the swimming status from the three flag buttons; it takes effect immediately (no apply button needed)
- For the water temperature, enter a value and press Publish to signage
- Tide times are fetched automatically from the JMA tide tables; no input is needed
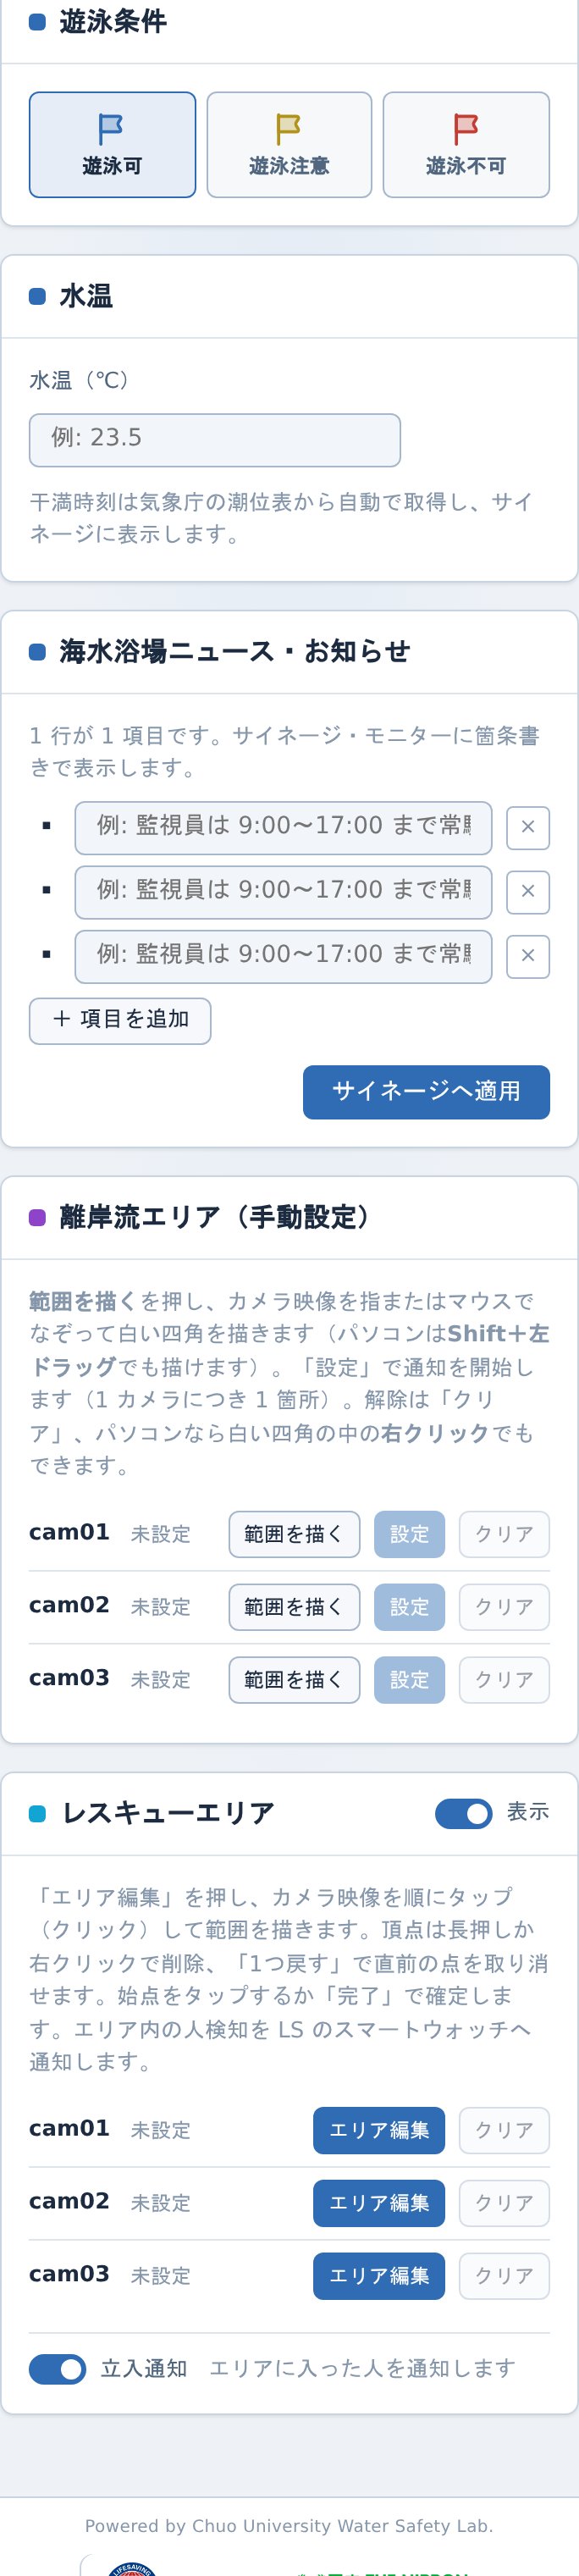
8.1 Beach news & notices
A bulleted list where one line is one item. Edit the lines, add more with + Add item, and delete with ×. Publish to signage pushes them to the signage, the monitor, and the smartphone app for beach visitors.
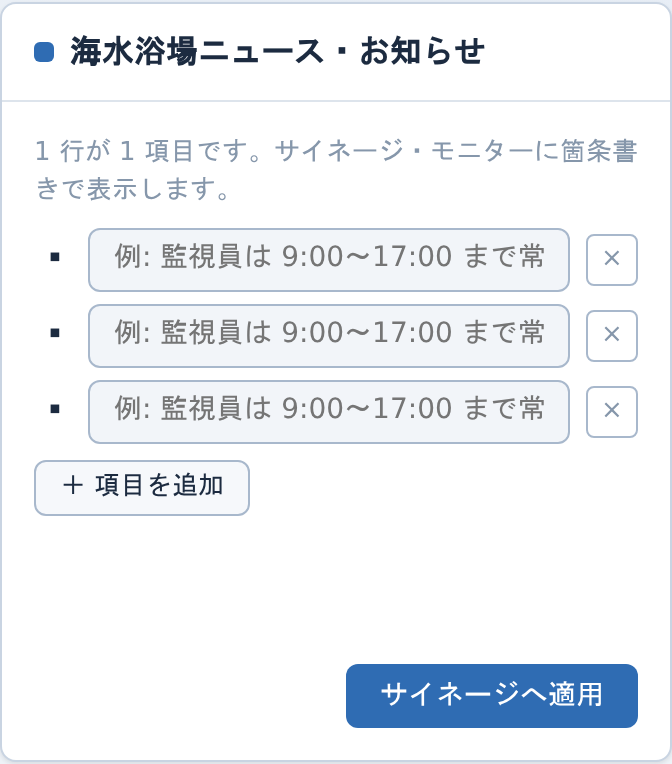
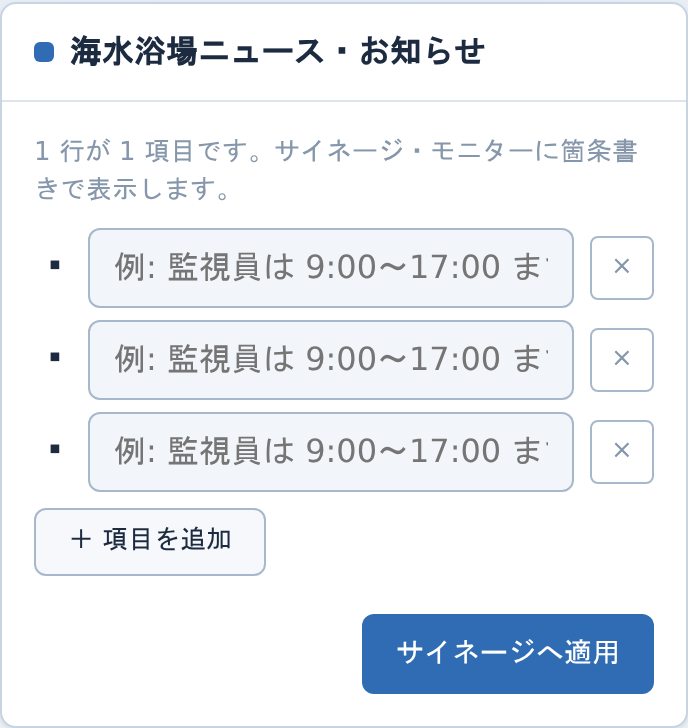
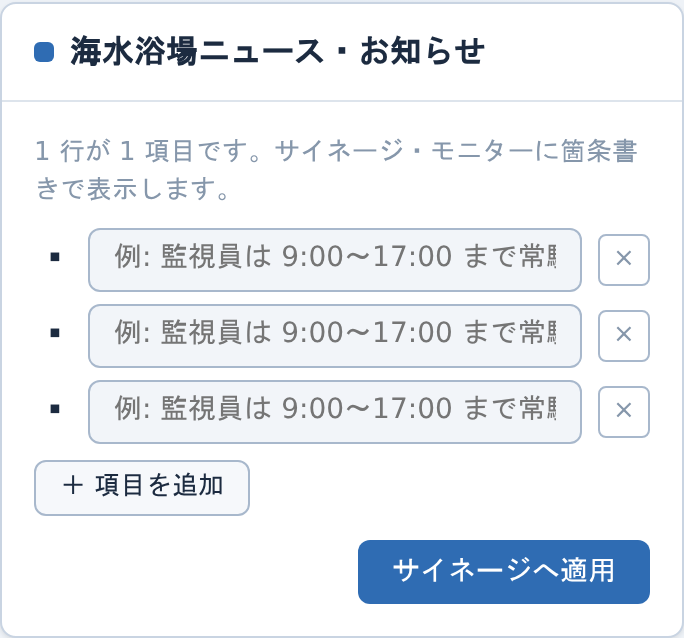
Pressing Enter while typing adds a line for the next item. Remove extra lines with ×.
9. Notification settings (/settings)
Sets the conditions for raising alerts, per detection type. Rip current detection covers rip currents, Person detection covers people, and Rescue area detection covers entry into the rescue areas of chapter 7.
| Item | Meaning |
|---|---|
| Alert interval | Width of the window, in seconds, over which detections are counted |
| Detection count | An alert is raised when this many detections occur |
| Alert pause | Time, in seconds, during which no further alert is raised after one |
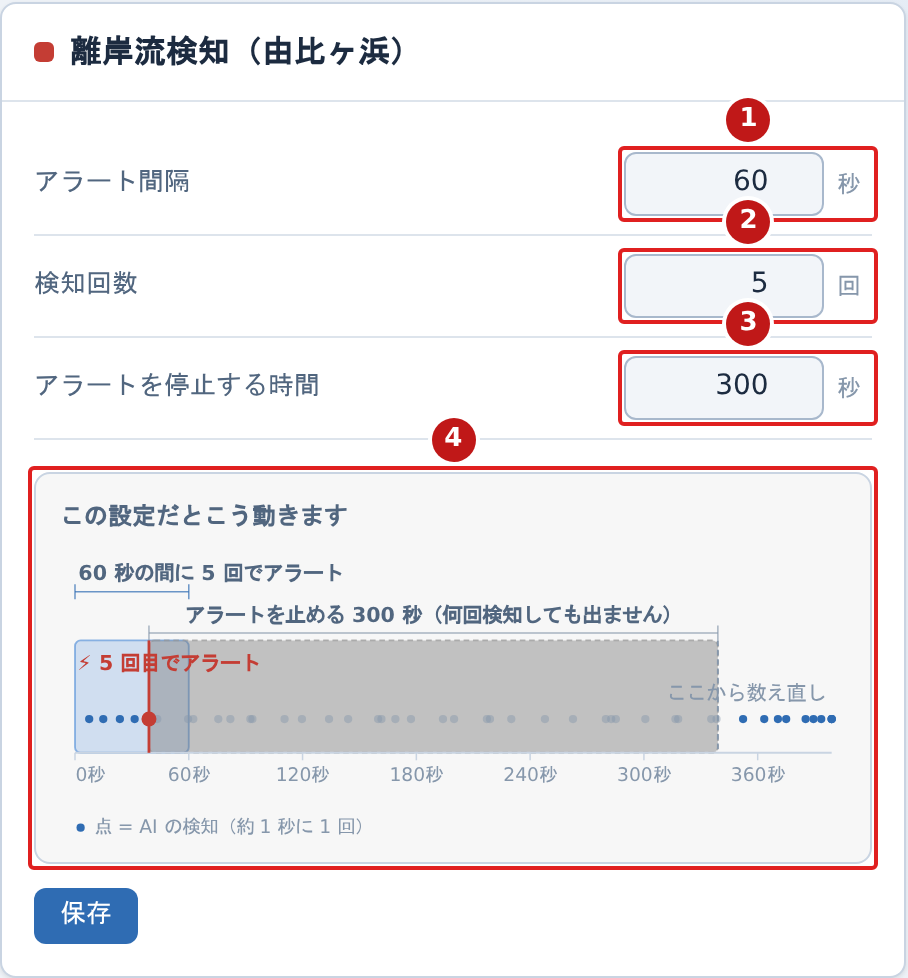
| No. | Item | Description |
|---|---|---|
| 1 | Alert interval | Width of the window, in seconds, over which detections are counted |
| 2 | Detection count | An alert is raised when this many detections occur |
| 3 | Alert pause | Time, in seconds, during which no further alert is raised after one |
| 4 | What these values do | A diagram that redraws on the spot as you change the values |
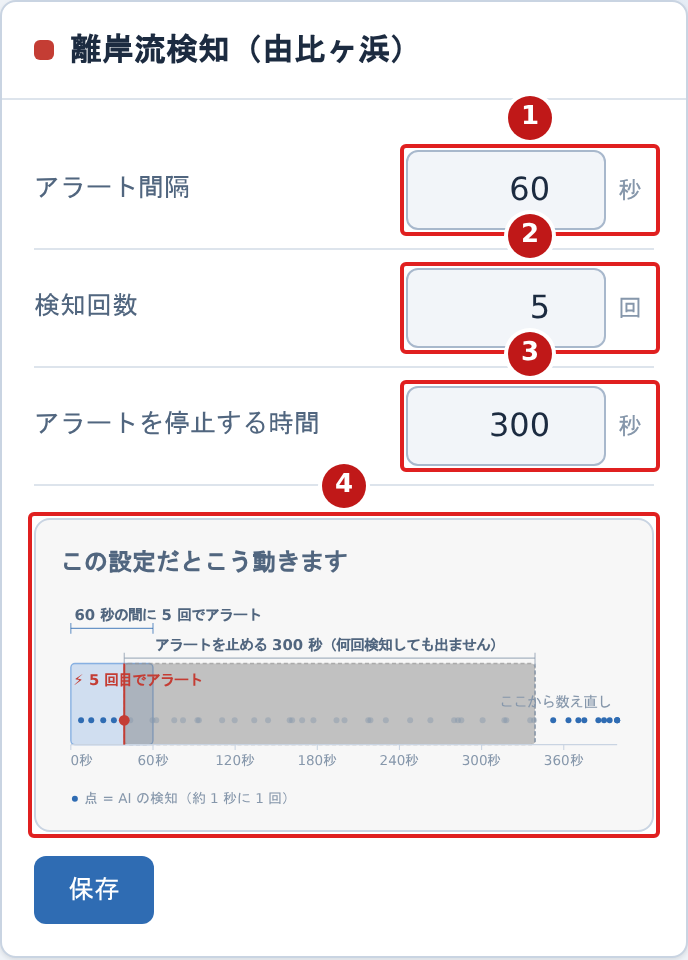
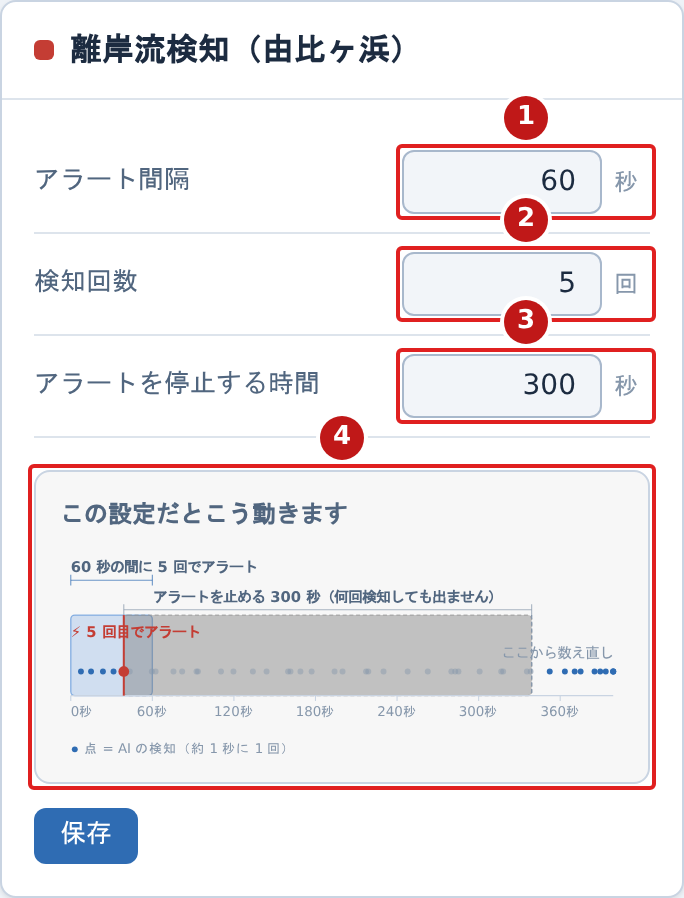
| No. | Item | Description |
|---|---|---|
| 1 | Alert interval | Width of the window, in seconds, over which detections are counted |
| 2 | Detection count | An alert is raised when this many detections occur |
| 3 | Alert pause | Time, in seconds, during which no further alert is raised after one |
| 4 | What these values do | A diagram that redraws on the spot as you change the values |
The AI repeats its check about once per second. For example, with "Alert interval 60 s / Detection count 5 / Alert pause 300 s" the behavior is as follows.
- 5 detections within 60 seconds raise an alert
- For the next 300 seconds no alert is raised, however many detections occur
- After the 300 seconds, counting restarts from zero
The "What these values do" diagram on each card redraws on the spot as you change the values, so you can check the effect before saving. To err on the safe side, lower the detection count.
Saved values reach the inference server in about 60 seconds.
10. Alert log (/logs)
The screen for reviewing past alerts. Corresponds to the legacy "alert history screen".
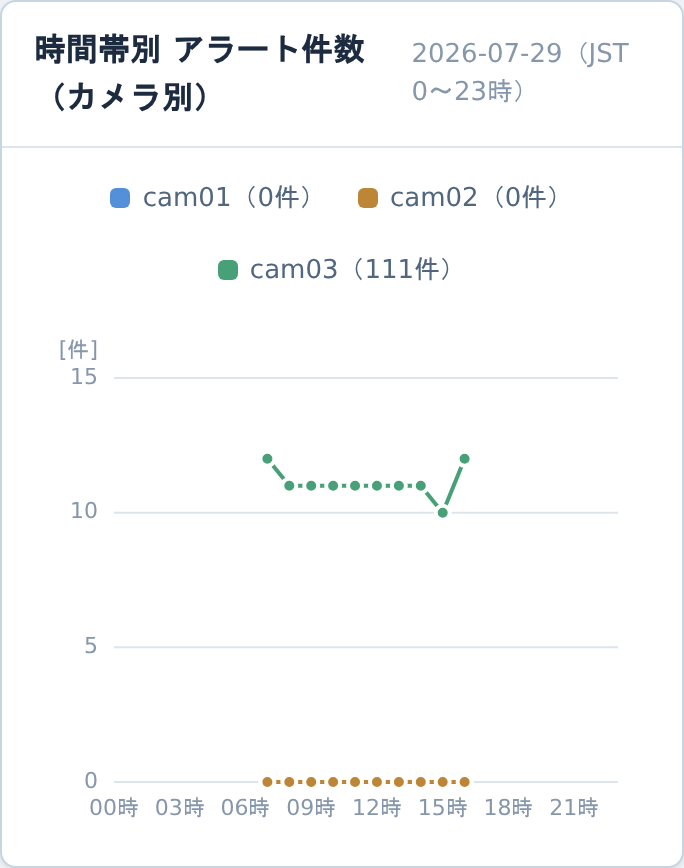
- Hourly chart: shows the selected day's alert counts per camera. When the selected day is today it is marked (in progress). Hours when AI detection was not running (outside operating hours, node stopped, or in the future) are shown as no data — no point is drawn — to distinguish them from "0 alerts"
- Type and camera filters: switch with the buttons. Counts are for the selected day
- Detection image gallery: lists the selected day's detection images. In the enlarged view, use ← → to step through and the Space key to play continuously
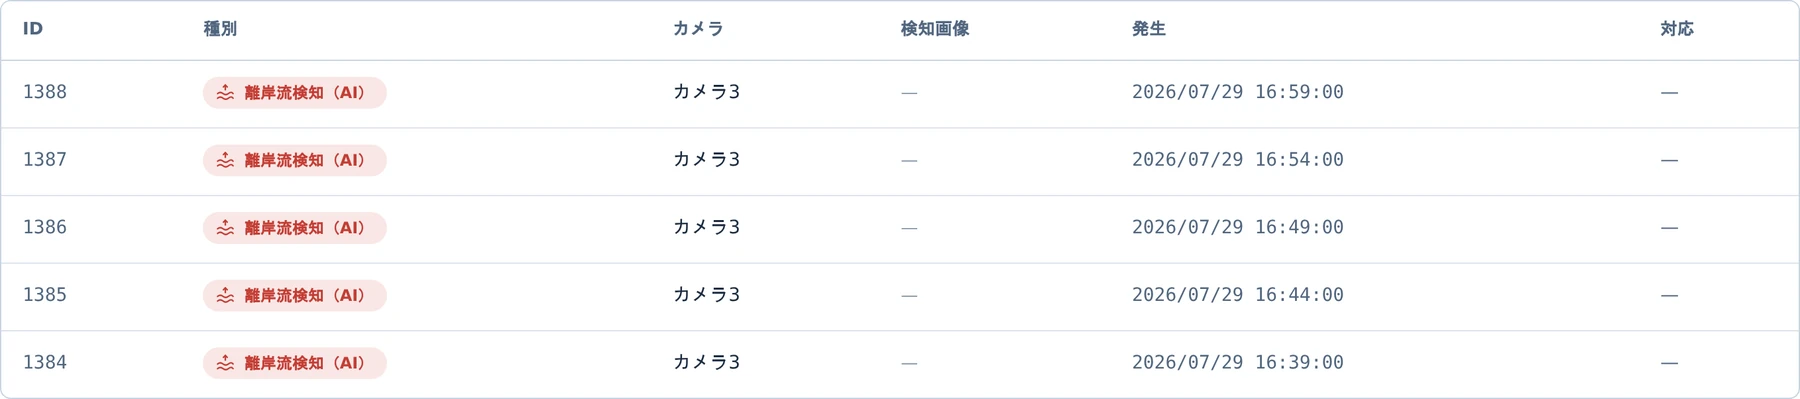
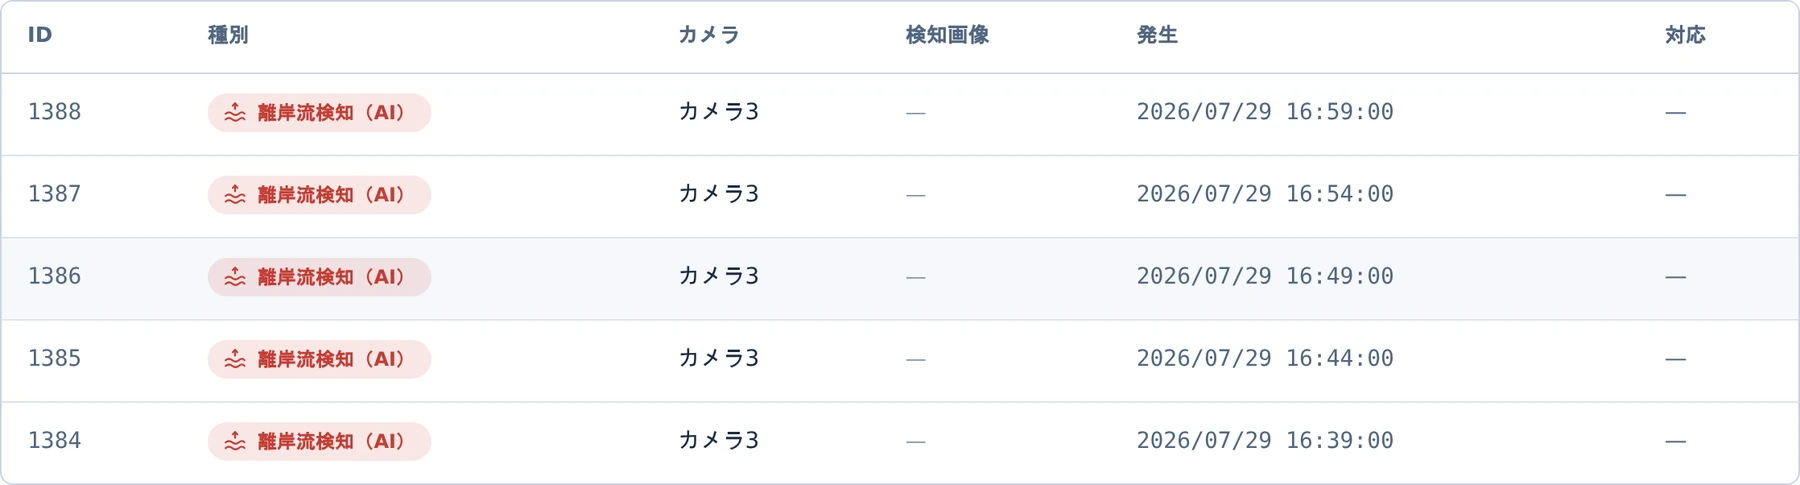
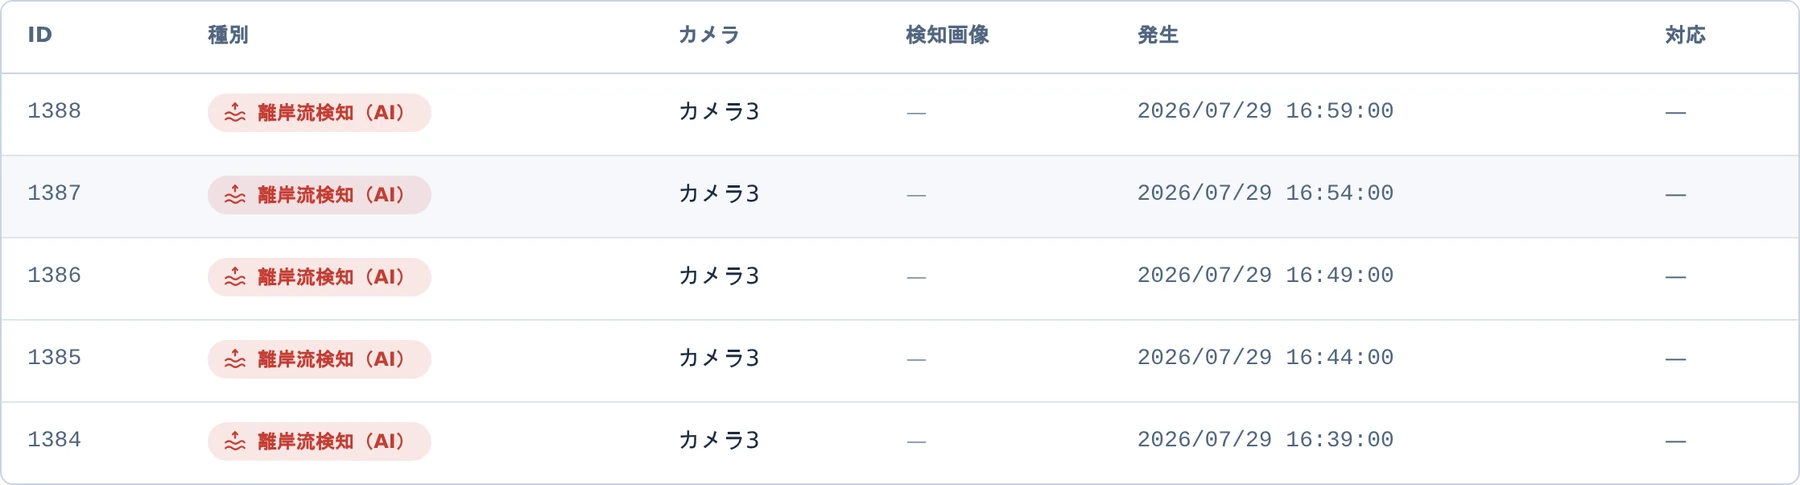
- History list: shows the ID, type, camera, detection image, raised time, and action for the selected day
- Rip current detections distinguish (AI) = detected automatically from (manual) = declared or set by an operator
- The "Action" column shows the operation pressed on the Manage screen (Start response / False alarm / Clear alert). Unhandled alerts show "—"
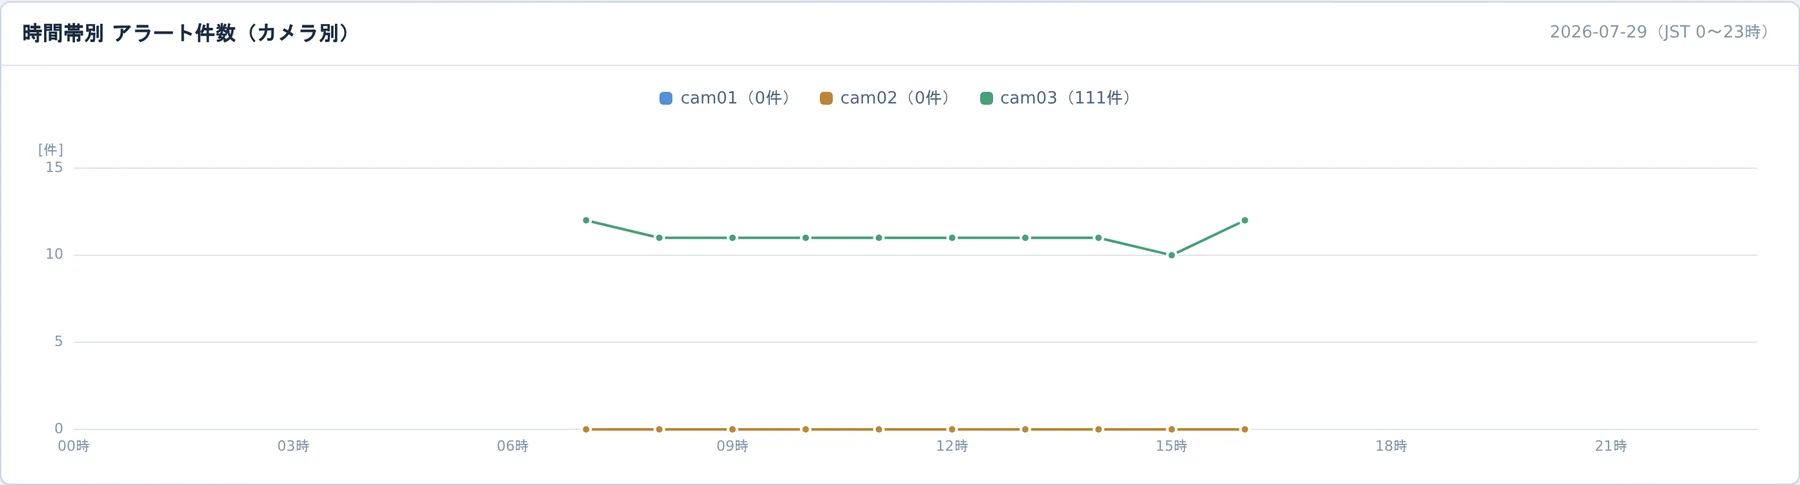
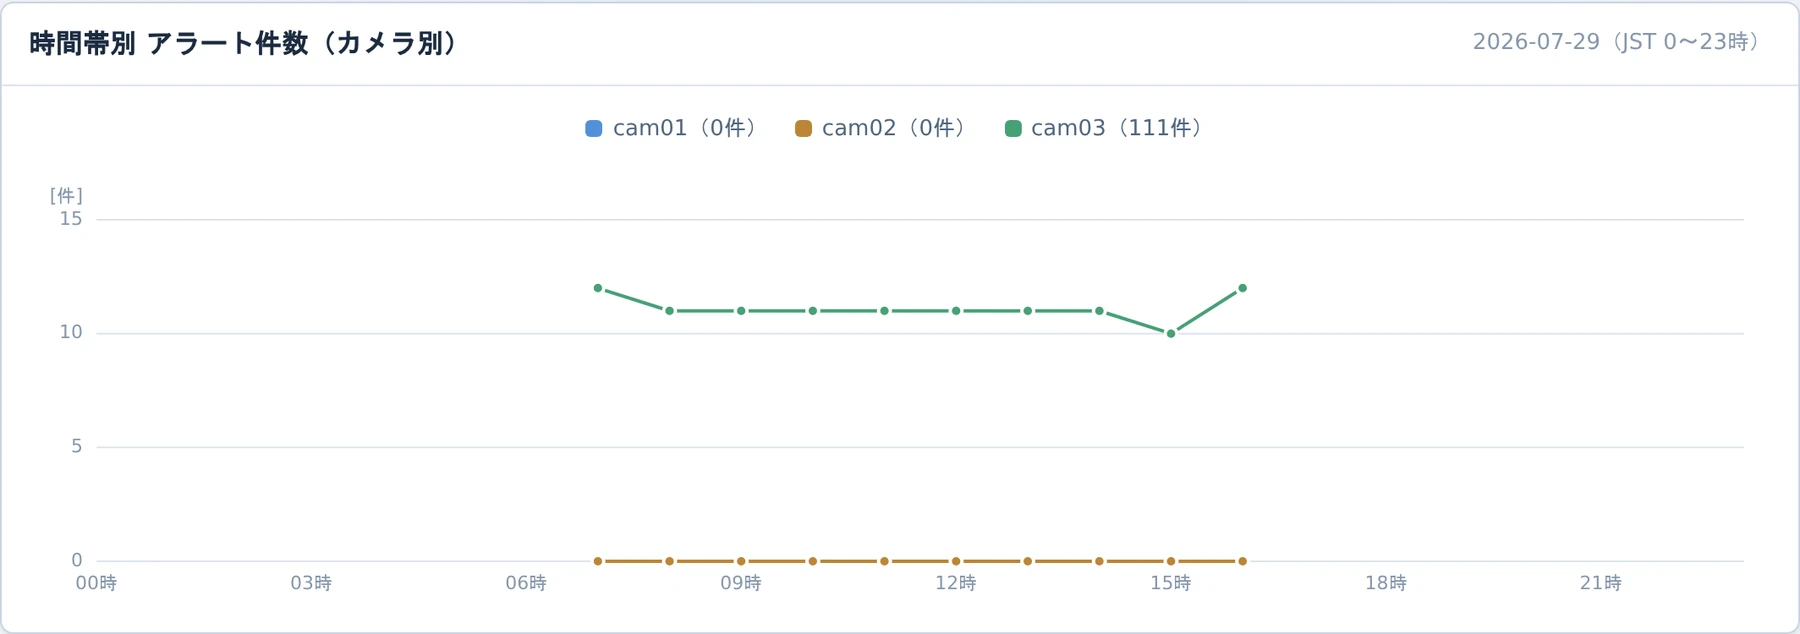
Hover over the chart to see the counts for that hour in a tooltip.
Tap the chart to see the counts for that hour in a tooltip. Slide a finger left or right to move between hours. If the table overflows, swipe sideways inside it.
11. Visitors (/people)
The screen for viewing an estimate of how many people were on the beach.
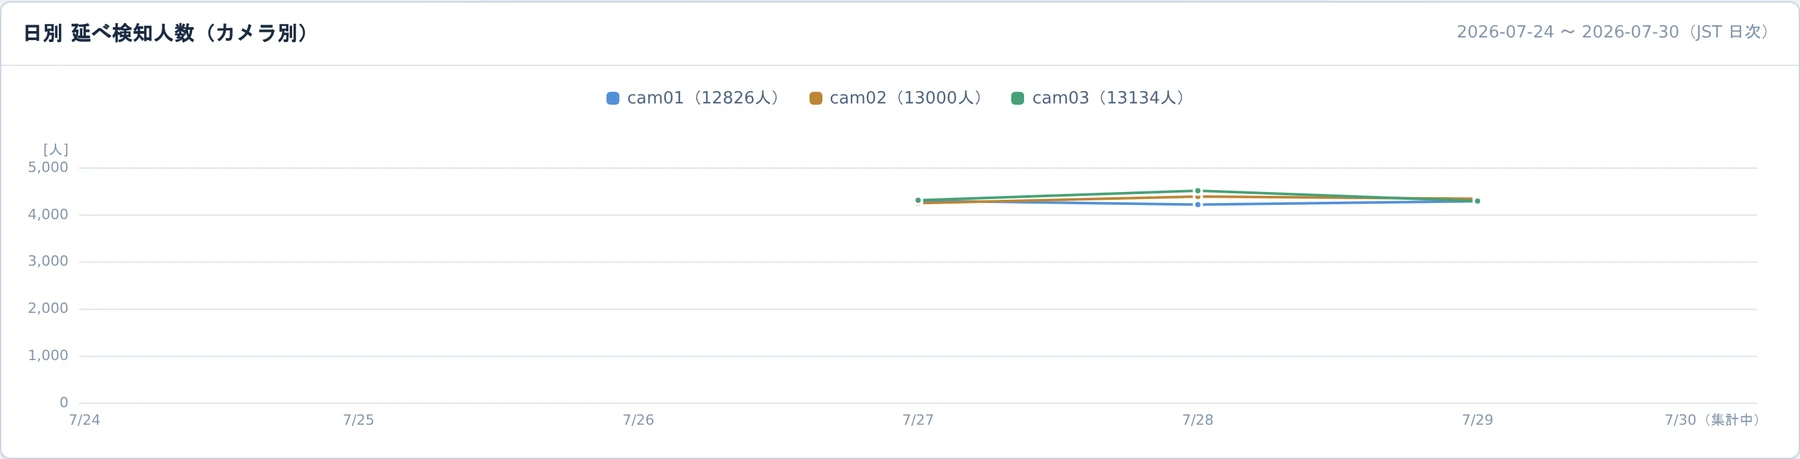
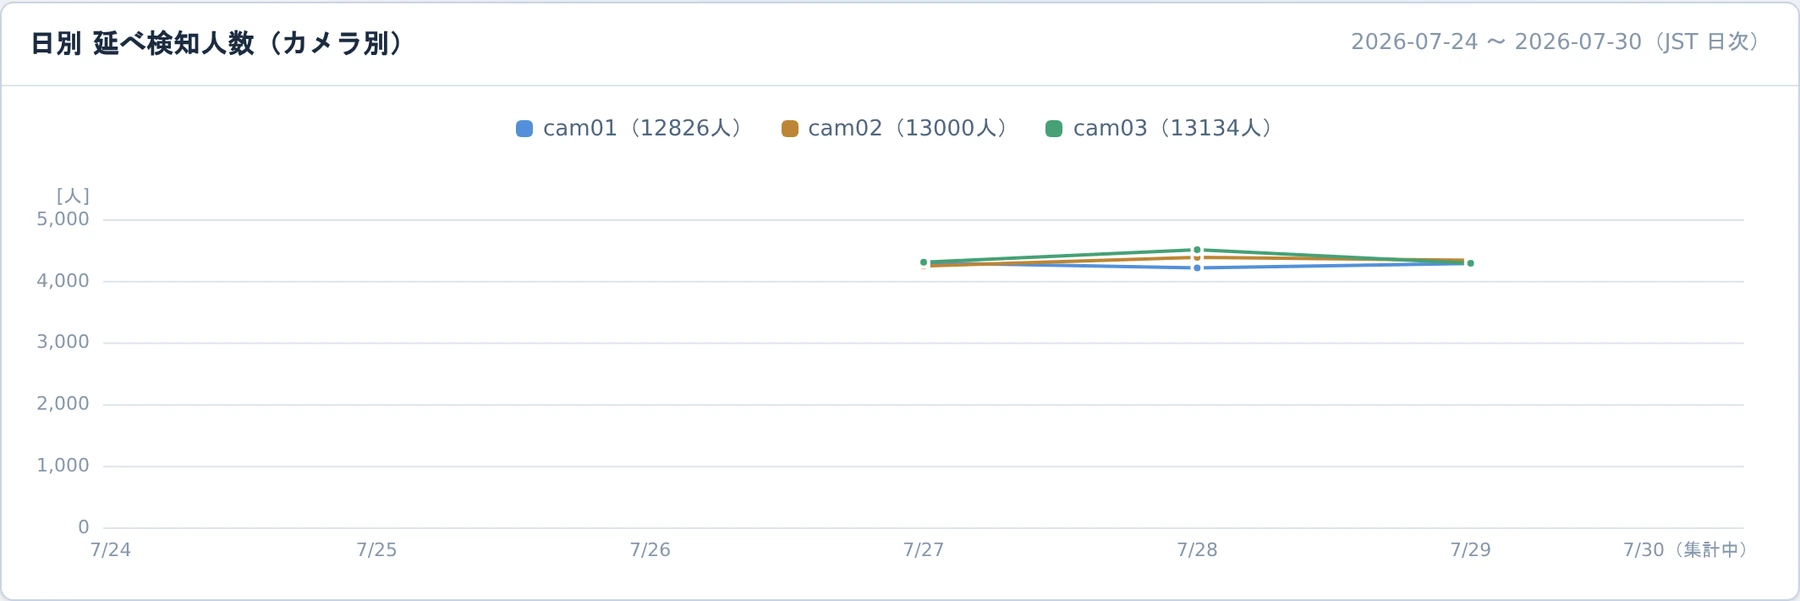
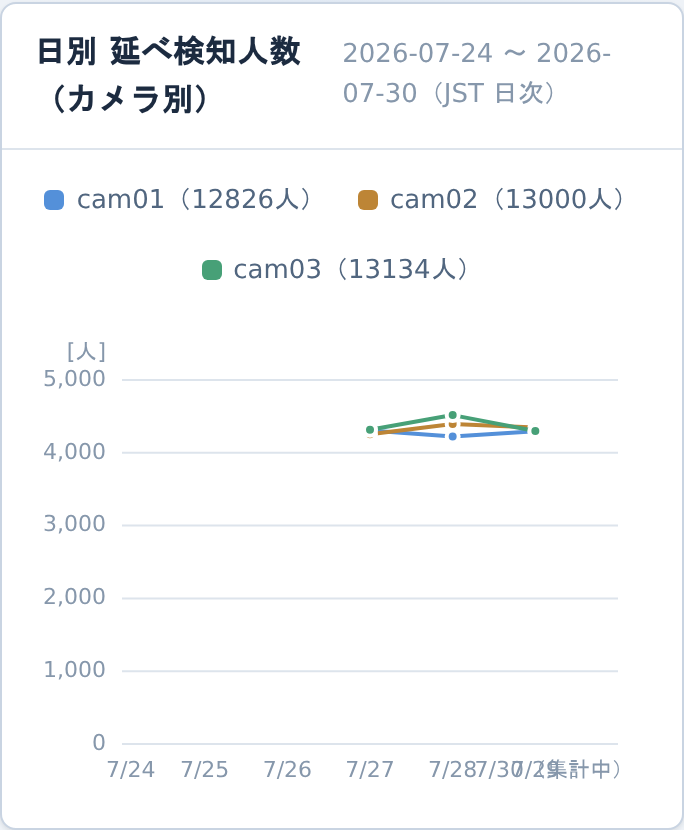
- Choose the range with the Period (7 days, etc.) and the Date at the top. The top row shows four statistics: the period total, the selected day total, the peak hour, and the number of saved images
- Shows cumulative detections per camera, by day and by hour. For the figures, open "Table (by day and camera)"
- No line is drawn for future hours. "0 people" and "no data" are shown differently
- Today's date and the current hour are marked (in progress) — their numbers are not final yet
- Select a point on the hourly chart to filter the saved images to that hour
- Saved images are shown 60 at a time; press Show more for more. They can be filtered by hour and camera, and played continuously from the enlarged view
- Images are saved every minute for every camera and deleted automatically after 7 days
12. Notification center (the bell on each screen)
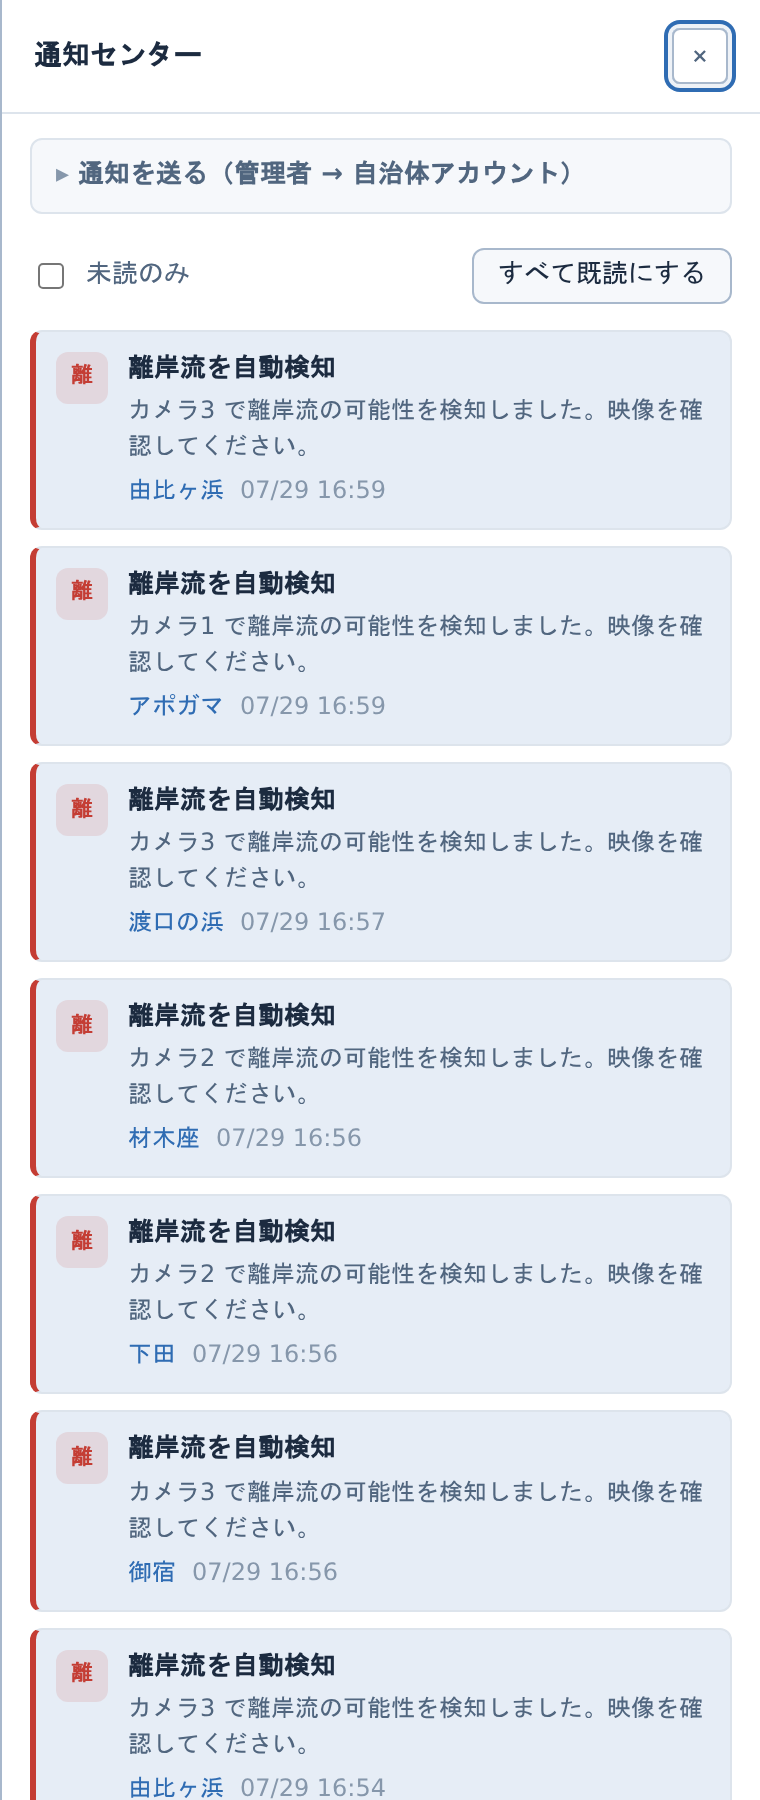
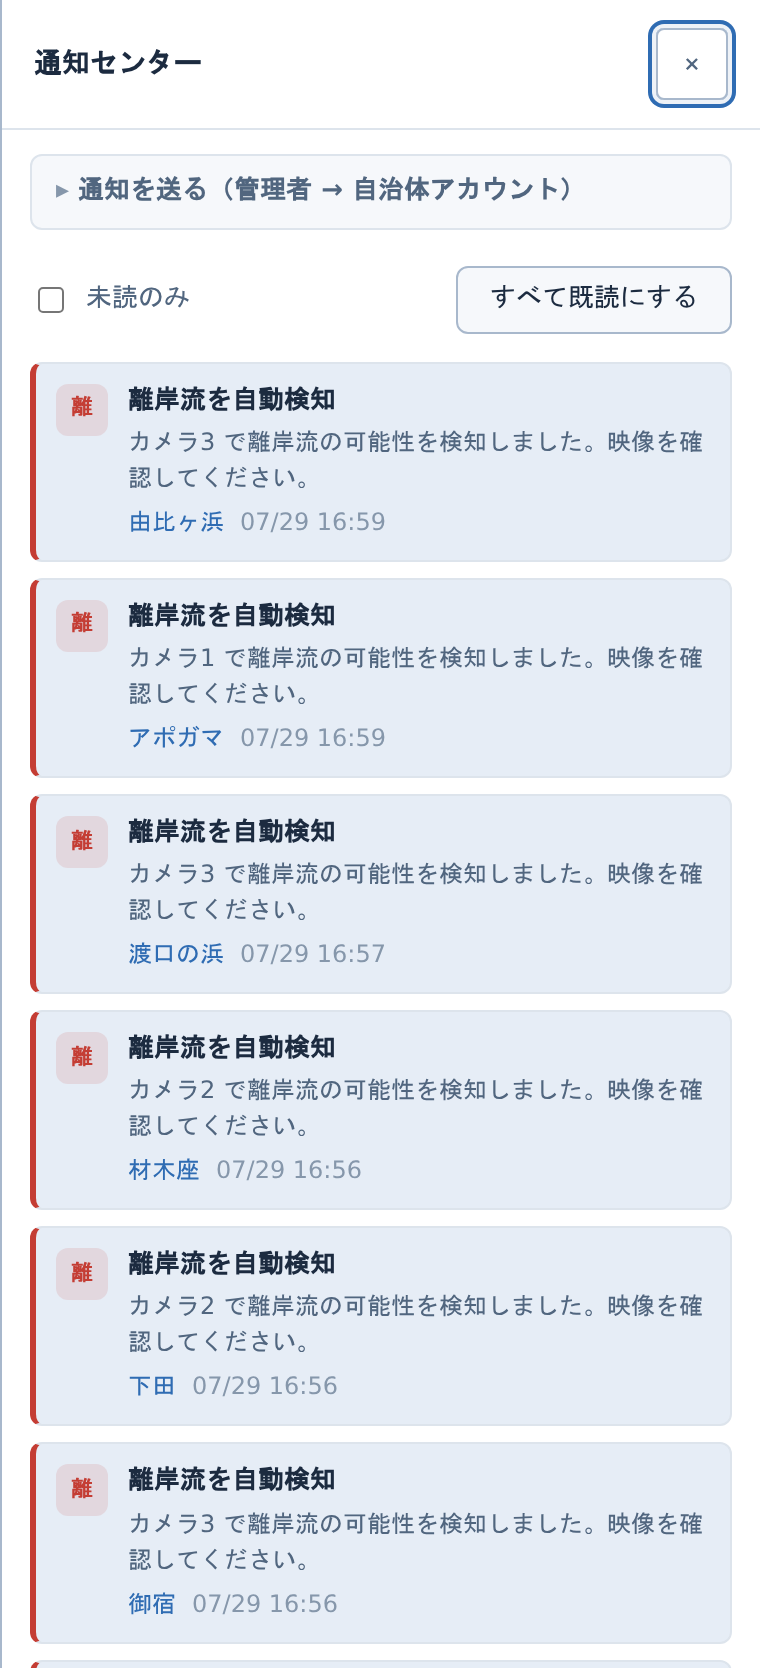
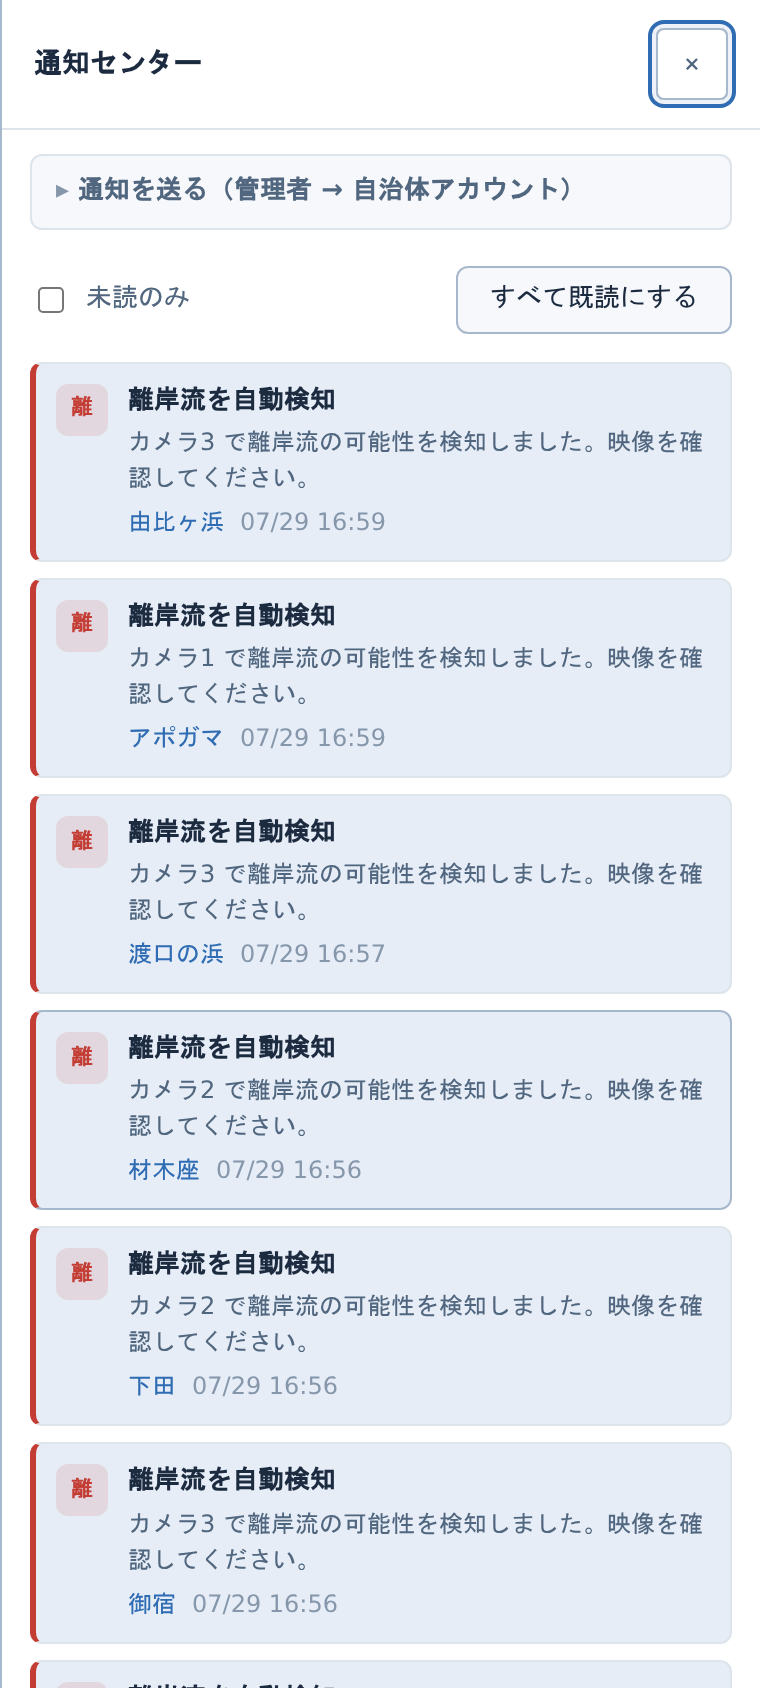
- Rip current alerts, area entries, rescue area settings (with an image), and messages from administrators appear in the list
- The unread count appears on the bell badge. Opening a notification marks it as read
- Administrators can use "Send a notification" to pick beaches and send a message to municipal accounts
13. Using a phone or tablet
The layout adapts to the screen size. Every operation can be completed by touch alone (no Shift key or right-click needed).
| On a PC | On a phone or tablet |
|---|---|
| Shift+left-drag (rip current area) | Press Draw area, then trace with a finger |
| Right-click to delete a vertex (rescue area) | Long-press the vertex, or Undo point |
| Right-click to clear the rip current area | Press Clear |
| Hover over a chart to read the values | Tap the chart |
| Double-click to enlarge a video | Double-tap to enlarge |
| F key for full screen | The ⛶ Full screen button at the right end of the beach bar |
| Navigation at the top | Tabs at the bottom of the screen |
14. Troubleshooting
| Symptom | What to check |
|---|---|
| The video shows "NO SIGNAL" | The camera or the network is down. Wait a while and reload |
| The screen stops updating / the connection dropped | The connection to the server was lost. It reconnects automatically (every 5 to at most 60 seconds) |
| Too many alerts | In Notification settings, increase the "Detection count" or lengthen the "Alert pause" |
| No alerts are raised | Use the diagram in Notification settings to check that the detection count can be reached within the alert interval |
| No buttons in the response row | Only alerts raised within the last 10 minutes are shown. Check older ones in the Alert log |
| Tracing with a finger draws nothing | Check that Draw area is pressed. You cannot draw on a camera that already has an applied area (press Clear first) |
| Cannot scroll over the video | Drawing mode is still on. Press Stop drawing or Done |
| The screen shows outdated content | Reload the browser (the cache can persist just after a release) |
15. Appendix: Mapping from the legacy system
| Legacy system | New console |
|---|---|
| RipCurrent.Client app, monitoring screen | Manage (/manage) |
| RipCurrent.Client app, alert history screen | Alert log (/logs) |
| RipCurrent.ControlAlarm app, alarm settings | Notification settings (/settings) |
| RipCurrent.Server app (signage) | Beach detail / Signage (/signage/{beach}) |
| Buttons below the camera view | Buttons directly below the camera images on the Manage screen (chapter 5) |
| Alert cancel | Clear alert |
| Start rescue / End rescue | Not carried over to the current console (consolidated into Start response, False alarm, and Clear alert) |
16. Appendix: Revision history
/api/health.
If the console and this manual show different versions, reload the browser.
| Version | Main changes |
|---|---|
| v1.0.1 | Security hardening: response headers, temporary lockout after repeated failed logins, session lifetime shortened from 12 to 8 hours |
| v1.0.0 | Dropped the "-beta" suffix (the BETA badge disappears from the screen) |
| v0.22.0-beta | Monitor now always opens on "All" (the wall of every beach) instead of jumping to the beach chosen on another screen |
| v0.21.5-beta | Apogama now uses the northern Okinawa forecast area (where Onna Village belongs) instead of the central-southern one; temperature station moved from Naha to Nago |
| v0.21.4-beta | Removed the swimming-status label overlaid on video in 1–2 beach view (duplicated by the info band); "No swimming" can no longer be selected for the two Okinawa sites |
| v0.21.3-beta | For the two Okinawa sites only "No swimming" is hidden (permitted / caution are shown); the flag buttons on Manage are always available |
| v0.21.2-beta | Monitor info band: swimming status no longer shown for the two Okinawa sites; wind and wave text is no longer cut off |
| v0.21.1-beta | Added the calculation note (i marker) to the alert-log chart; the "i" icon is slightly larger again |
| v0.21.0-beta | The beach selector is now available to any account with two or more beaches (no longer admin-only) |
| v0.20.2-beta | The 20-minute chart tooltip now shows the time only; the "i" icon is slightly larger |
| v0.20.1-beta | The "i" description marker is now a line icon |
| v0.20.0-beta | Lab feedback (2026-08-15): beach order, auto-switch moved into the beach bar, descriptions behind i marks, "Detection"→"Notifications" and "People"→"Visitors", larger and stronger text and axis labels, save button right-aligned, sticky beach bar, total line on charts, visitor figures changed from cumulative to a 20-minute average [people/20min], swimming status hidden for the two Okinawa sites |
| v0.19.5-beta | Person / rescue-area detection defaults set to 60 s, 3 times, 60 s; "Rescue line detection" renamed to "Rescue area detection" |
| v0.19.4-beta | Auto cycle on the Monitor screen is now on by default (turning it off lasts until the screen is reopened) |
| v0.19.3-beta | Video-card badge changed to "Today N alerts" (from /5 min; per camera, cumulative from 0:00) |
| v0.19.2-beta | Y-axis units ([alerts] / [people]) on charts; "(in progress)" also on today / the current hour in hourly charts |
| v0.19.1-beta | Manual body text now uses the full width; hours running with zero detections show as "0" (no data = AI stopped only); Auto cycle switch added to 3.1 |
| v0.19.0-beta | Alert-log "no data" hours (distinguished from 0 while AI is stopped), "(in progress)" on today in People counts, expanded Auto cycle notes |
| v0.18.2-beta | During an alert, person detection is pinned to the rip-current position at alarm time (same as the red frame on screen) |
| v0.18.1-beta | Manual fixes (alert-response figure, body-text wrapping, -beta labeling); alert-log stat renamed to "Peak hour (selected day)" |
| v0.18.0-beta | Live (MJPEG) camera view; automatic still-image fallback for unreachable cameras |
| v0.17.0-beta | Access records (IP, screen, time spent) stored; larger bottom tabs on phones |
| v0.16.0-beta | Beta labeling; phone three-line menu, vertical scrolling and footer; beach-detail fullscreen button and maximized cameras; home-screen icon |
| v0.15.0 | Instant alert-clear updates, auto-clear of manual rip areas, rescue-area entry-alert switch |
| v0.14.0 | Fix for people-detection false positives (frame-sized boxes); beach selection carried across screens |
| v0.13.0 | Alerting-beach indicators (red dot / ALERT badge), grouped bell counter, English manual, weather text in English |
| v0.12.1 | Detection boxes restored on the Manage screen too; box-position fix for 4:3 cameras |
| v0.12.0 | Per-beach detection models; saved images expanded to every minute, all cameras |
| v0.11.1 | Detection boxes on the beach-detail screen; manual auto-adapts to the opening device |
| v0.11.0 | Detection boxes saved and restored after reload, auto-clear of unattended alerts, multi-camera alerts |
| v0.10.0 | Live "occurring" display for rip currents; manual split into PC / tablet / phone editions |
| v0.9.0 | Screenshots added to the manual, phone-layout fixes, operating hours set to 7:00–20:00 |
| v0.8.0 | Touch support, built-in web manual, Japanese / English toggle, version display |
| v0.7.0 | Alert-log screen reworked; detection images unified across LINE and smartwatches; automatic weather and tide data |
| v0.6.0 | More reliable camera-feed retrieval; Manage and Detection screens reorganized |
| v0.5.0 | Screens implemented from the design mockups; running in the staging environment |
| v0.4.0 | Database overhaul, integration with the existing system, municipality accounts |
| v0.3.0 | Production screen designs completed (all six views) |
| v0.2.0 | Migration to the new detection engine; three beaches served by one GPU |
| v0.1.0 | Development started |